Bedford Tile Cleaning

Bedford Tile Cleaning

Welcome to my Work History archive where you will find examples of the cleaning and renovation of tiles carried out in Bedford.

Victorian Tiled Pathway Restoration Bedford

Rust-Stained Victorian Tiled Pathway Repaired and Restored in Bedford

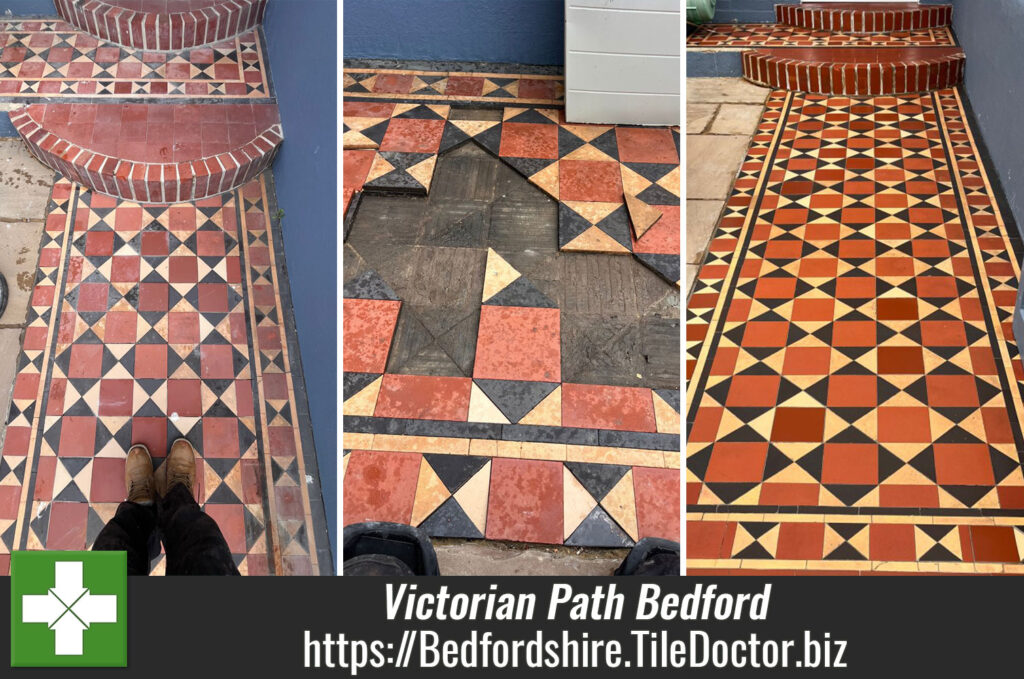
After 140 years of use this Victorian tiled pathway at a property in Bedford had seen a lot of traffic and wear. Although generally well maintained the floor had some major problems including loose and broken tiles and rust straining from the use of metal planters.

Victorian Pathway Before Restoration Bedford

I visited the property to survey the path and advise on the work needed to restore it for another 140 years of use. I calculated there were approximately 70 tiles that needed attention and took detailed pictures and measurements so I could source matching replacements.

I was confident of being able to restore the path and provided a quote that included cleaning and sealing the tiles and replacing the broken tiles and dealing with the rust. Happy with the plan the quote was accepted and an initial date booked in for the work to start, I say initial date as I need a dry weather window for external work.

Repairing a Victorian Tiled Path in Bedford

Work began with repairing the broken and loose tiles using the matching tiles I had managed to source in time for the job. Removing the loose and cracked tiles must be done carefully so as not to disturb adjacent tiles and making the job a lot larger than originally intended.

Victorian Pathway During Repair Bedford Victorian Pathway During Repair Bedford

With those tiles removed the replacements combined with salvageable original tiles are dry fitted into position making any cuts as necessary. With the tile pattern worked out the tiles were laid using rapid setting flexible adhesive.

Deep Cleaning a Victorian Tiled Path in Bedford

Once the tiles had set work moved on to cleaning which began with the application of a strong dilution of Tile Doctor Driveway and Patio Cleaner. This product works best when used with long dwell times and in this case some of the path needed much longer times than others to get them clean.

Next job was to deal with the rust impregnation and for this Tile Doctor Rust Away was applied. This product breaks down the rust turning it a purple colour that can then be simply rinsed off and extracted. Once done the tiles were inspected and the process repeated if required and, in this case, it took four applications to complete.

Still not quite satisfied with the appearance of the tiles I ran a set of Tile Doctor Diamond Pads fitted to a rotary machine over the tiles. I worked through different grits from 50 up to 1500 grit to bring the brightness back. These pads are applied with water for lubrication and then the floor rinsed and extracted with a wet vacuum after each pad.

After a final rinse the floor was dried as much as possible using a wet vacuum and left to dry off overnight.

Sealing a Victorian Tiled Path in Bedford

Once the path had dried it was sealed with Tile Doctor X-Tra Seal which is oil-based and externally rated with UV protection making it ideal for applications like this one. This product is a fully breathable, colour intensifying sealer which really brought the colours in the tile back to life.

Victorian Pathway After Restoration Bedford

The client was in London during the work so we sent pictures and received this reply:

`Thanks for making our path look lovely`

Client satisfaction is always at the forefront for us and when we receive messages like this it really makes our day.


Professional Restoration of a Victorian Tiled Path in Devon

Rust-Stained Victorian Tiled Pathway Repaired and Restored in Bedford Read More »

Victorian Minton Tiled Floor Restoration Bedford

Minton Tiled Victorian Hallway Floor Fully Restored in Bedford

We often see Victorian tiled floors, like this Minton tile example in Bedford, where they have become damaged or broken due to years of neglect or simply because pipes were laid for central heating. Owners of floors like this often have them covered up with carpet until a new owner reveals what was under the carpet and decides they would like the original feature back. The owner of this property had made exactly that decision and contacted Tile Doctor to find out what could be done to resolve their Victorian tiled hallway floor.

I paid a visit to the property to survey the floor and immediately saw there were two sections of tiling that had been dug out during the installation of radiator pipework. The sections were then backfilled with cement ruining the look of the floor.

Victorian Minton Tiled Hallway Floor Before Restoration Bedford

The client required the original look back again to enhance the original features of the property.
Having restored numerous period floors previously I was confident all these problems could be resolved and the floor renovated to a high standard.

Repairing and Cleaning a Victorian Minton Tiled Floor

Before cleaning the floor the cemented sections needed to be dealt with starting by carefully chipping out the cement that had been used to provide a level surface for the carpet. The rubble was raked out and a new bed laid with self-levelling cement. Since my initial visit I was able to track down matching replacement tiles and these were then used to rebuild the missing sections of flooring.

Victorian Minton Tiled Hallway Floor During Repair Bedford

Once the repairs had set the cleaning process could begin starting with the application Tile Doctor Remove and Go worked in with a coarse 200-grit diamond pad. Remove and Go is a powerful tile cleaning product that as the name suggests will remove all sorts of coatings such as sealers. Small hand-held Diamond blocks were used for cleaning up the corners and edges where the pads struggle to reach. This action pulls the dirt out from the pores of the tile to the surface where it is then rinsed away with water and extracted using a wet vacuum.

The final clean involves giving the floor an acid rinse for which I use Tile Doctor Grout Clean Up. This final step removes old grout smears, efflorescent salts and counters the use of alkaline cleaning products such as Remove and Go leaving the floor with a neutral ph. Lastly it etches the tile slightly resulting in a stronger bond with the sealer, improved finish, and better performance. After another rinse and extract the floor was then dried to a sufficient level using floor fans and I returned two days later to seal the floor.

Sealing a Victorian Minton Tiled Floor

After checking the floor was dry with a damp meter, I set about applying a single coat of Tile Doctor Colour Grow which is an impregnating sealer that soaks into the pores of the tile improving colour and adding protection from within. Once dry it was followed up with several coats of Tile Doctor Seal and Go which provided the subtle sheen finish my client wanted.

Victorian Minton Tiled Hallway Floor After Restoration Bedford

As usual before leaving we like to advise the customer on how to maintain the tiles using a compatible cleaning product such as Tile Doctor Neutral Cleaner. This aftercare product has a neutral ph. which won’t impact the sealer like many of the standard bleach-based products you find in supermarkets.


Professional Victorian Tiled Hallway Floor Restoration in Bedford

Minton Tiled Victorian Hallway Floor Fully Restored in Bedford Read More »

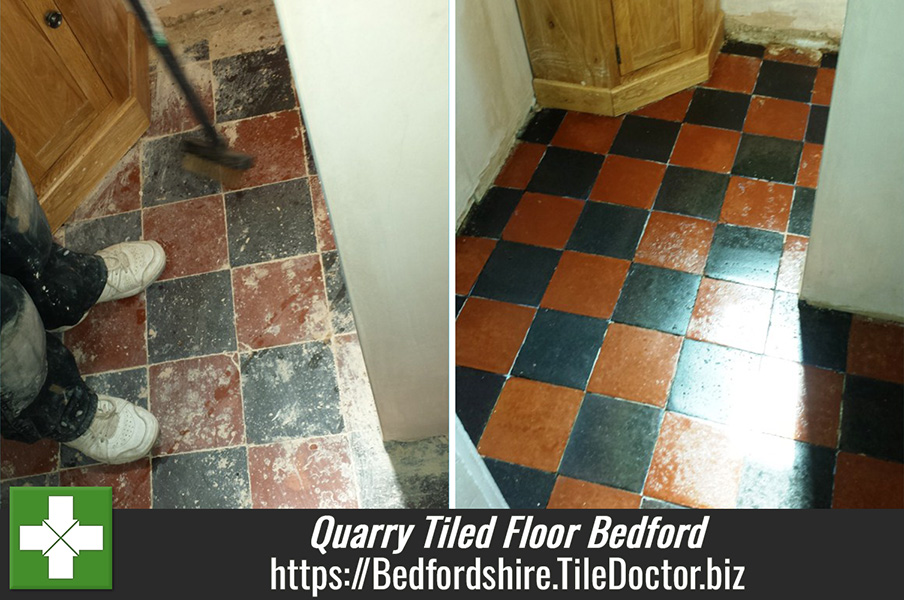
Quarry Tiled Floor Renovation Bedford

Old Quarry Tiled Kitchen Floor Restored at Grade II Listed Building in Bedford

The owner of this property in Bedford was convinced little could be done to restore the appearance of these Kitchen Quarry tiles at the best thing to do would be to cover them up, however as the building was Grade II listed thought it would be best to get a professional opinion first and I was asked to take a look.

Quarry Tiled Kitchen Floor Bedford Before Cleaning

I went over to survey the floor and could see that over the years pits had developed in the surface of the tile which had trapped dirt resulting in black staining. In my analysis I thought we could certainly improve their appearance but hesitated at promising the world as even I had not seen a quarry tile this badly damaged. However the client was happy with the quotation and the request was `Do what you can!`

Quarry Tiled Kitchen Floor Bedford Before Cleaning

Cleaning Grubby 200-Year-Old Kitchen Quarry Tiles

I could see this floor was going to be a challenge so after protecting all the skirting boards, kitchen units and appliances I set about soaking the tiles in a strong cocktail of Tile Doctor Remove and Go with Nanotech HBU, HBU stands for Heavy Build-Up so quite appropriate I thought.

The next step was to run over the tiles with a set of burnishing pads of different grades which are encrusted with industrial diamonds. It took more than one attempt at this process but the abrasive pads had the desired effect and eventually revealed the beautiful quarry flooring below. The pads are effective on the tiles but the grout sits a little lower and so to reach these a stiff brush was scrubbed into the grout by hand where needed.

To remove the dirt that was released from the cleaning process and further clean the tiles I used an extraction tool that’s powered from a large compressor that sits in my van. This forces hot water under pressure onto the tiled floor whilst simultaneously extracting the dirty water back to a separate tank using a vacuum. It’s an amazing tool that is very effective however you do need to have the van parked close the house due to a limitation on the hose lengths.

With the tiles now clean and rinsed with water the floor was dried as much as possible with a wet vacuum and left to dry for a couple of days.

Sealing 200-Year-Old Kitchen Quarry Tiles

On my return I first tested the floor with a damp meter to ensure it was dry; all was well so I able to move onto applying a sealer that would further enhance the appearance of the Quarry tiles and add protection.

Given the age of this floor I decided to use a modern fully breathable product and selected Tile Doctor X-Tra Seal which work by occupying the pores of the tile, improving colour, and preventing dirt from becoming ingrained there.

Quarry Tiled Kitchen Floor Bedford After Renovation

The client was in fact over the moon with the results and given the floor was 200 years old I even impressed myself. For me, even after having done this work for over 30 years it still provided a sense of achievement, a perfect combination of experience coupled with modern chemicals, machinery and working methods.

Quarry Tiled Kitchen Floor Bedford After Renovation


Professional Restoration of an Old Quarry Tiled Floor in Bedfordshire

Old Quarry Tiled Kitchen Floor Restored at Grade II Listed Building in Bedford Read More »

Deep Cleaning, Sealing and Polishing 120m2 Limestone Tiled floor in Biddenham

Deep Cleaning, Sealing and Polishing 120m2 Limestone Tiled floor in Biddenham

The client from the Bedford village of Biddenham had requested a quote to restore the look of their Limestone floor tiles which were laid throughout the whole ground floor including lounge, hallway and kitchen covering approximately 120m2 in total. The floor needed a thorough clean, filling of holes in high traffic areas followed by polishing and then sealing.

Limestone Tiled Lounge Floor Before Cleaning Biddenham
Over time, the floor in this busy household with 2 large dogs had become dirty and certainly worse for wear with all the use it had been getting. A quote was given and accepted and work was booked in to be carried out over 4 days with 2 Tile Doctor technicians on site for 2 of those days.

Limestone Tiled Kitchen Floor Before Cleaning Biddenham

Deep Cleaning Limestone Floor Tiles

We returned on the agreed date and started work to get this floor back to looking its best. My initial task before beginning the cleaning process was to apply a protective wrap around the oak doors and moving heavy furniture with sliders that the client couldn’t move themselves to give us a clear area to work in.

Limestone Tiled Hallway Floor Before Cleaning Biddenham
We then applied Tile Doctor Pro-Clean, diluted with water, to the floor. Pro-Clean is a strong alkaline cleaner that is suitable for use on all natural stone floors such as Limestone, Slate and Travertine.

After leaving the solution to dwell for a few minutes, We began to scrub over sections (Approximately 10m2 at a time) with a 17” scrubbing pad fitted to a buffing machine, whilst helping to remove a lot of the built up dirt on the surface of the tiles, the products also stripped off the old sealer, this was then rinsed and removed using a wet pick up machine. Following this we paid special attention to the grout lines, scrubbing with grout brushes and Tile Doctor Grout Clean-Up.

After completing the cleaning, I rinsed the floor again with clean water to remove any excess cleaning products. I then began to burnish the floor using Tile Doctor Diamond encrusted burnishing pads. This was done in four steps, as I used four different pads (coarse, medium, fine and very fine) rinsing the floor with water between each pad. Starting with a coarse pad and then gradually working up to the very fine pad achieving a high polish finish in the process. I finished off the process with a quick rinse and a white buffing pad to give the floor a final polish before I commenced the sealing of each area the following day to allow grout and stone to fully dry overnight.

Sealing Limestone Floor Tiles

The client requested a natural look finish so my choice of sealer was Tile Doctor Ultra Seal which will protect the floor but not change the colouring in any way. The sealer penetrates deep into the pores of the stone, providing water resistance and long-term protection from ingrained dirt and stains.

Limestone Tiled Kitchen Floor After Cleaning Biddenham Limestone Tiled Lounge Floor After Cleaning Biddenham

This was a large area so it took some time to complete but it was well worth the effort, certainly the customer thought so and left the following feedback on the Tile Doctor Feedback System.

Phil and his team were polite, friendly and professional at all times. Nothing was too much trouble for them and they worked very diligently to ensure they got the best possible outcome and the floors l. . . ok better than new at the end.

As you can see from the comments the client was extremely happy with the results and he has asked for details of our maintenance plan to keep his floors looking their best for years to come.

Limestone Tiled Hallway Floor After Cleaning Biddenham

Large Limestone Floor Renovation in Bedfordshire

Deep Cleaning, Sealing and Polishing 120m2 Limestone Tiled floor in Biddenham Read More »

Ruined Marble Shower Tiles Restored in Sharnbrook

Ruined Marble Shower Tiles Restored in Sharnbrook

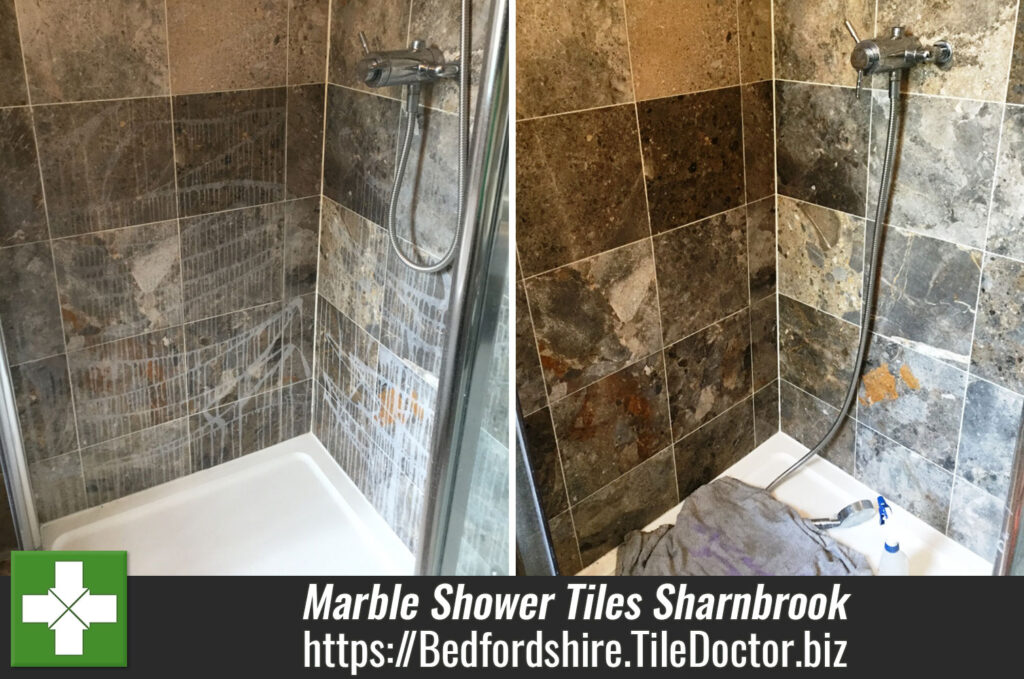
I was contacted by the owner of a cleaning company in Milton Keynes, after an end of tenancy clean at a house in Sharnbrook went wrong. Unfortunately a member of their staff had incorrectly applied an acid based cleaning product to the Marble shower tiles which like most natural stone is acid sensitive. The cleaning product had etched the stone causing the damage you can see below. Being a reputable company they were determined to put the situation right and we were asked to step in.

Marble Shower Cubicle Before Cleaning in Sharnbrook
We have had a few issues of this type before where customers keen to remove unsightly Limescale marks from their stone tiles use a household cleaner without reading the bottle label first to see if it’s safe to use. Issues of this nature on Marble cannot be easily resolved with chemical products; it takes specialist knowledge and equipment.

Marble Shower Cubicle Before Cleaning in Sharnbrook
The quote was given and accepted and the work was booked in with the letting company for a few weeks later.

Cleaning and Polishing a Marble Shower Cubicle

The first photos show the extent of the damage which had not only damaged the immediate area but as the cleaning product was in liquid form it had ran down the wall had totally ruined the surface of the tiles in the lower half of the shower.

The first thing I did was to protect the shower tray with towels and then began assembling the equipment needed for this job which consisted of a wet polisher, a variable speed polisher, one set of 6” Tile Doctor burnishing pads from 100 grit to 3,000 grit and one full set of diamond blocks from 80 grit upwards.

I then went about testing how far down the scale I would have to go to get the best results. I found that in most areas the application of a 200 grit burnishing pad was adequate to resurface the tile and remove damage but in some areas I had to go down the scale as low as 80 grit to achieve the desired result.

Marble Shower Cubicle During Cleaning in Sharnbrook
One the damage had been removed the higher grit pads are used in sequence to restore the polish finishing with the 3,000 grit pad. No chemicals are used in this process, just water and the small six inch diamond encrusted burnishing pads which fit to a hand buffer.

Although only a small area, no more than 4 m2 this job took most of the day. However, as the whole shower room was tiled in the same tiles it was a much more cost effective to restore the damaged tiles than replace them.

Marble Shower Cubicle After Cleaning in Sharnbrook
We were able to achieve an excellent result which the client was very happy with, no doubt saving the cleaning company thousands of pounds in replacement costs.

Marble Shower Cubicle After Cleaning in Sharnbrook
 

Professional Restoration of a Damaged Marble Tiled Shower Cubicle in Bedfordshire

Ruined Marble Shower Tiles Restored in Sharnbrook Read More »

Restoring the Spoiled Appearance of a Sandstone Tiled Patio in Bedford

Restoring the Spoiled Appearance of a Sandstone Tiled Patio in Bedford

This is the ideal time of year for property owners to not only think about restoring their internal natural stone floor tiles, but also their external tiles. With it being Summer, the weather is warm and dry enough for patio restorations to take place.

The photographs below show a recent restoration of a two-year old Sandstone tiled patio at a property on a new build development in Bedford, the country town of Bedfordshire. Sandstone is a naturally porous stone, which does make it more vulnerable to the elements when it is used for outside flooring and is not sealed.

Sandstone Patio Bedford Before Cleaning
Unfortunately, the patio had not been sealed when it was first installed, and during the two years since, the combination of damp weather, a lack of sunlight in shaded areas, and a build-up of green staining from moss spores – together with general dirt and grime – had greatly spoiled the appearance of the beautiful stone.

Sandstone Patio Bedford Before Cleaning

Cleaning a Spoiled Sandstone Tiled Patio

My first course of action in carrying out the restoration was to lightly coat the patio with Tile Doctor Pro Clean. This is a multi-purpose, alkaline-based cleaner which is suitable for use on most natural stone, including Sandstone, Granite, Limestone, Slate, and Travertine.

The product was subsequently agitated with a scrubbing brush fitted to a rotary machine, before I pressure washed the patio at a medium pressure to avoid damaging the stone. As you can see from the photos below, this cleaning made a great improvement to the condition of the patio – in fact, it appeared almost new again! The customer was very pleased with the outcome.

Sandstone Patio Bedford After Cleaning
The customer decided not to have the patio sealed, as he preferred the natural look and would prefer to have it cleaned on a yearly basis. Sealing is less important for external tiles, as compared to internal tiles, however if you do decide not to seal your patio, it’s highly recommended that you establish a routine maintenance plan for the stone. Otherwise, you run the risk – after just a few years – of allowing your tiles to end up in a similar condition to this Sandstone tiled patio before it had been restored.

Sandstone Patio Bedford After Cleaning
 

Professional Cleaning and Restoration of a Spoiled Sandstone Tiled Patio in Bedford

Restoring the Spoiled Appearance of a Sandstone Tiled Patio in Bedford Read More »

Ceramic Tiled Bathroom with Mould Issues Refreshed in Bedford

Ceramic Tiled Bathroom with Mould Issues Refreshed in Bedford

Having mould in your bathroom is never a desirable situation, especially in a family home with young children. Additionally, severe mould can cause a range of health issues, including respiratory problems, nasal congestion, and throat irritation, so it’s important to remove it as soon as possible.

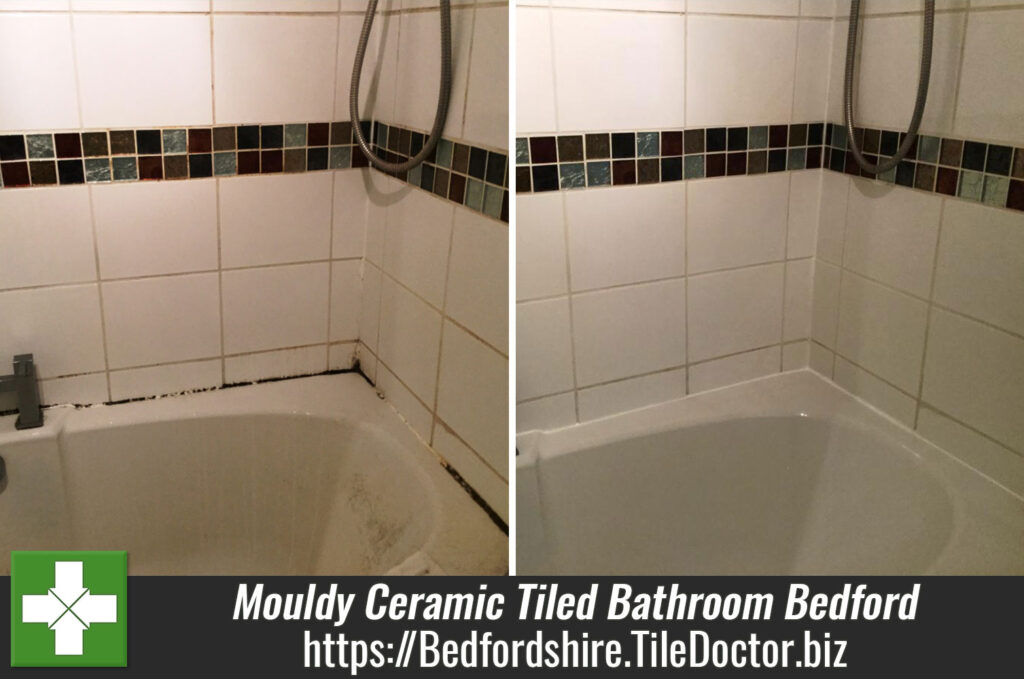
I mention this as I was recently called out to a family home in Bedford recently because the parents were getting worried about the mould developing in the Ceramic tiled bathroom, especially on the lower tiles and silicon around the bath. Naturally, they wanted it to be removed as they didn’t want to expose their children to it, so a quote was issued and the work to restore the tiles was booked in for the following week.

Ceramic Tiled Bathroom Before Cleaning Bedford Town Centre Ceramic Tiled Bathroom Before Cleaning Bedford Town Centre

Cleaning and Sealing a Mouldy Ceramic Tiled Bathroom

Before starting the work, I covered the bathtub with dust sheets and towels to prevent any chemical spillages. Then, to begin, I applied Tile Doctor Mould Away which is specially formulated to removing mould and black spots from grout and silicone. This is quite a potent product, so it is advisable to wear protective gloves and goggles.
I sprayed the Mould Away on the entire area around the bath and shower unit, as well as the pedestal wash hand basin, before scrubbing it in by hand using a stiff brush. I left this to dwell while I started to cut out the old silicon from around the bath, and once this had been done, I rinsed the product off the tiles.

Next, I diluted a solution of Tile Doctor Grout Clean Up with water, this product contains concentrated phosphoric acid and is designed to remove grout haze, mineral deposits, and other smears. This solution was sprayed onto the worst-affected areas of the grout to remove any remaining soil deposits. I also gave the tiles a second rinse and, while the grout was drying, I finished cutting out and removing the old silicon.

Following this, I lightly dried all areas with a heat gun and sealed the grout with Tile Doctor Ultra-Seal, which is a natural-look, penetrating sealer deigned to provide maximum stain protection. Finally, I installed a fresh mould-resistant silicone sealant between the tile and bath to replace the old, mouldy silicone.

Ceramic Tiled Bathroom After Cleaning Bedford Town Centre Ceramic Tiled Bathroom After Cleaning Bedford Town Centre

Within a short day of work, I had managed to completely transform the appearance of this Ceramic tiled bathroom. The customer was extremely pleased with the result.

Mould problems are extremely common in small bathrooms with inadequate ventilation. Whilst the regular application of Tile Doctor Mould Away will keep the problem in check you can also improve the ventilation by leaving the bathroom door and a window open for a while after use.

Refreshing a Ceramic Tiled Bathroom with Mould Issues in Bedfordshire

Ceramic Tiled Bathroom with Mould Issues Refreshed in Bedford Read More »

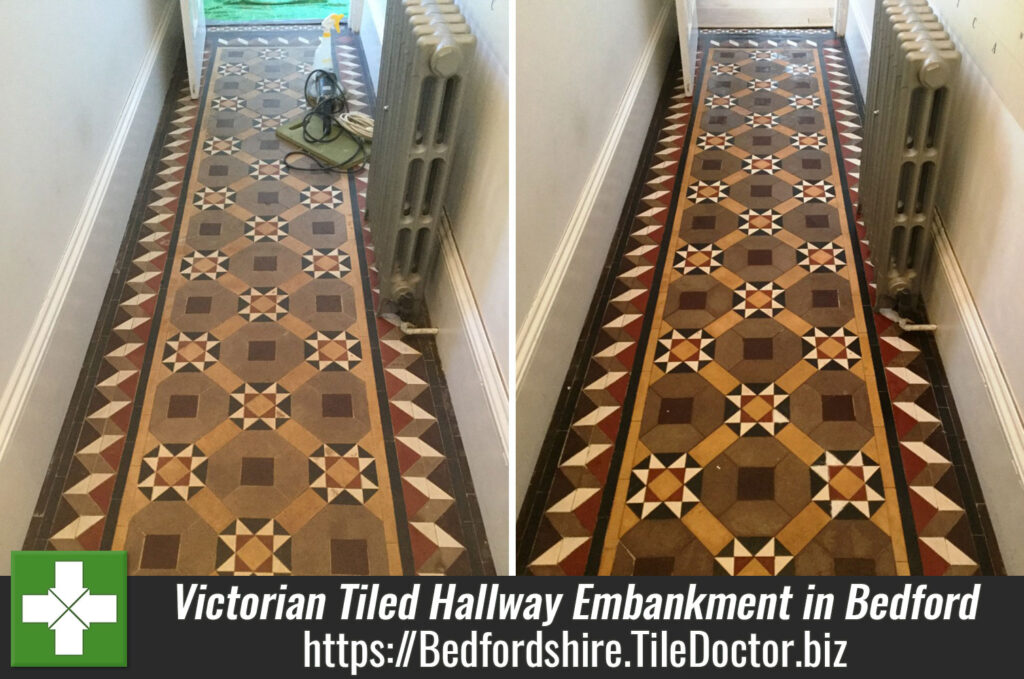
Victorian Tiled Hallway Deep Cleaned at The Embankment in Bedford

Victorian Tiled Hallway Deep Cleaned at The Embankment in Bedford

The following photos show a lovely traditional Victorian hallway floor in a period property close to the Great Ouse river in the city of Bedford, a city with a rich history that dates back to medieval times.

The floor was in very good physical condition for its age but was very dirty due to not being sealed for many years allowing a build-up of soil to embed in the surface of the tiles. When this happens, we find general cleaning is no longer effective at thoroughly removing all the dirt and the result is a dull tiled floor that never looks its best.

Victorian Tiled Floor Before Cleaning The Embankment Bedford
To restore the tiles to their former glory the floor would need to be stripped back, deep cleaned and then resealed.

Victorian Tiled Floor Before Cleaning The Embankment Bedford

Cleaning an Original Victorian Tiled Floor

My first course of action was to vacuum the floor to remove light dust and debris, this was then followed by applying a Tile Doctor Pro-Clean diluted with warm water. Pro-Clean is a strong alkaline tile and grout cleaning product that is safe to use on all types of tile and stone. The solution was decanted into a spray bottle and then sprayed onto the tiles working in sections of several metres at a time.

The Pro-Clean was left to soak into the tile and grout for about ten minutes before being agitated with a rotary machine fitted with a black scrubbing pad. The soiled solution was then rinsed off with water and extracted from the floor with a wet vax. The process was then repeated through the entire area.

Once the whole floor was treated in this manner I then switched to a new cleaning process for Victorian tiles that is now being taught at Tile Doctor. The process resurfaces the tile by applying a special diamond impregnated pad fitted to a rotary machine and lubricated with water. The pad is worked over the tiles in sections as before rinsing each section with water after the application of the pad. Once the last section was treated in this manner and rinsed I moved onto the last step in the cleaning process by giving the floor an acid wash which helps neutralise the tile and helps to combat salts rising through the stone.

To do this I applied Tile Doctor Acid Gel to the entire area, leaving it to dwell for a short period before rinsing off with water, extracting again with the wet vax and then leaving the floor to dry off overnight.

Sealing an Original Victorian Tiled Floor

I returned the following day to carry out minor repairs to small chips in the tile and also to replace missing and loose grout. This needed to set before I could seal the floor so once complete I left for the day which had the added benefit of allowing the floor to dry for another day. I also left a dehumidifier running on site to assist with the drying process.

On the third day, I returned to seal the floor with three coats of Tile Doctor Colour Grow, which is a matt finish impregnating sealer that occupies the pores in the tile protecting it from within. Colour Grow also has other advantages, it enhances the colours in the tile and it’s a breathable sealer which will allow any dampness in the subfloor to evaporate which is important for older floors that have no damp proof course.

Victorian Tiled Floor After Cleaning The Embankment Bedford
I also left the client a free sample of our cleaning solution Tile Doctor Neutral Clean which is recommended for the regular cleaning of sealed tiles. I also left them with written maintenance instructions which will help them to keep their floor looking at it’s best for years to come.

Victorian Tiled Floor After Cleaning The Embankment Bedford
 

Professional Restoration of an Victorian Tiled Hallway in Bedfordshire

Victorian Tiled Hallway Deep Cleaned at The Embankment in Bedford Read More »

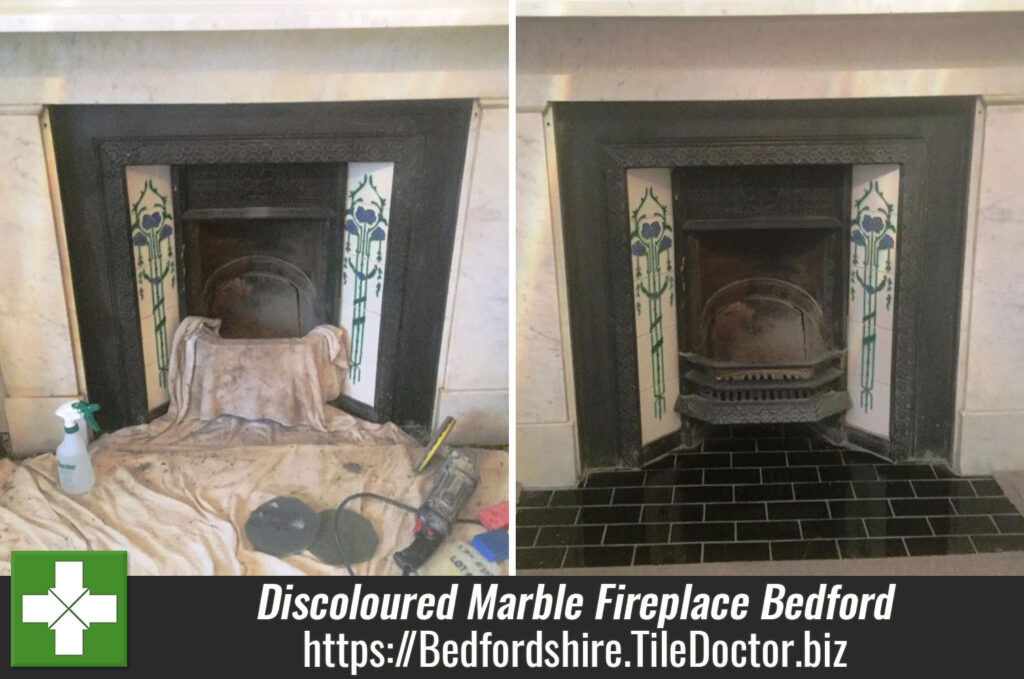
Stained and Discoloured Marble Fireplace Rejuvenated in Bedford

Stained and Discoloured Marble Fireplace Rejuvenated in Bedford

As you may know already, Tile Doctor aren’t limited to the maintenance and restoration of tiled floors. Our expertise covers all different types of tile and stone cleaning, meaning we are even able to clean and restore stone fireplaces. A good example of this is a polished Marble fireplace I recently restored in Bedford, which is the county town of one of England’s smallest counties, Bedfordshire. Marble is reputed in the international market for its premium quality, toughness, and durability, making it a great choice for a fireplace – if you can keep it properly maintained!

The following pictures show the state of the fireplace before the restoration. As you can see, the stone was stained and discoloured, possibly from smoke damage as it had previously been used as an open fire. My task was to get the Marble back to looking its best again through a combination of polishing and sealing. Here’s how I did it.

Marble Fireplace Before Cleaning Bedford

Cleaning a Stained and Discoloured Marble Fireplace

The process I took to restore the fireplace is much the same as the one I would for tiled floor polishing except on a smaller scale and with smaller tools. Cleaning a vertical surface can be trickier and make a bit more of a mess with possible splashes, so I fully sheeted up the area, covering the customer’s furniture and newly decorated walls.

It involved the application of six inch diamond encrusted polishing pads of varying grits, fitted to a handheld machine, as well as handheld diamond encrusted blocks to get into all small, difficult to reach areas. Just like with tiled floor polishing, I started with a Coarse grit pad to grind away the tough stains and then worked my way through the system of different grades of pads until finishing with a very fine pad to refine the polished finish.

Marble Fireplace During Cleaning Bedford

Sealing a Marble Fireplace

Once the fireplace had been polished to a high standard, I sealed the stone using Tile Doctor Ultra Seal, which is a premium, no-sheen, natural-look, solvent-based penetrating sealer formulated to provide maximum stain protection. It’s perfect for high-end natural stone like Marble, it can also be used on Granite, Slate, Travertine, and Limestone to achieve a high shine finish and protect the stone.
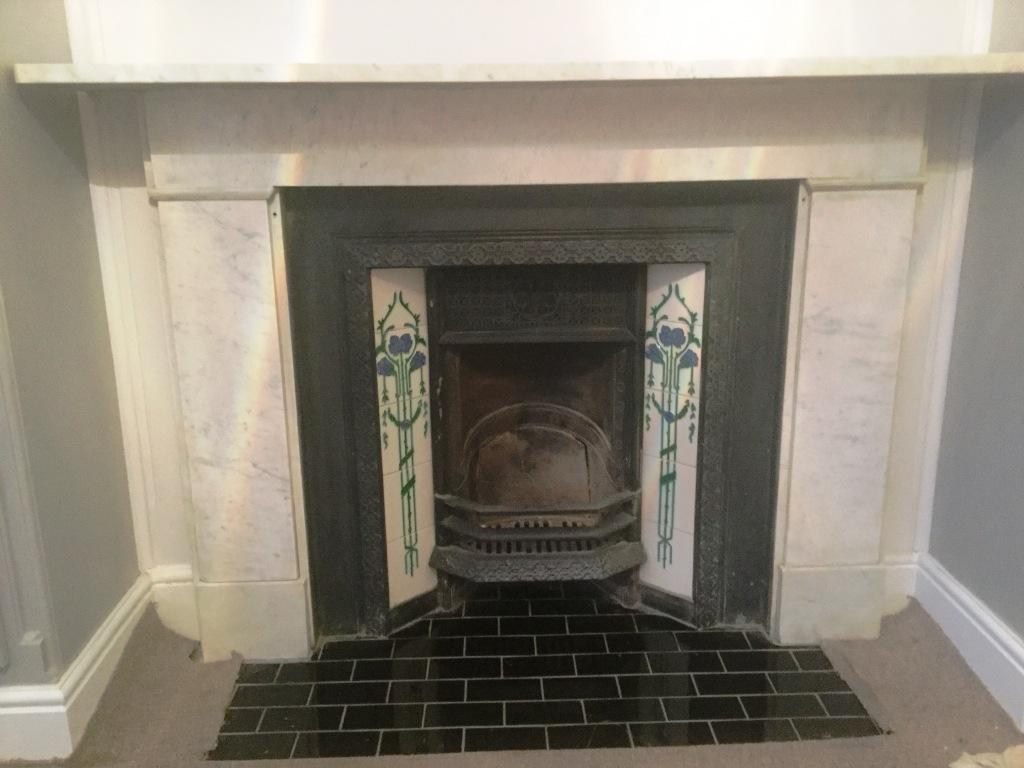
By the time, I had finished it was starting to get dark, so unfortunately the photo below, which shows the result, does not show off the quality of the shine that I was able to achieve on the Marble. Nevertheless, the customer was very happy with the results.

Marble Fireplace After Cleaning Bedford
 

Professional Stone Cleaning and Sealing for a Marble Fireplace Restoration in Bedford

Stained and Discoloured Marble Fireplace Rejuvenated in Bedford Read More »

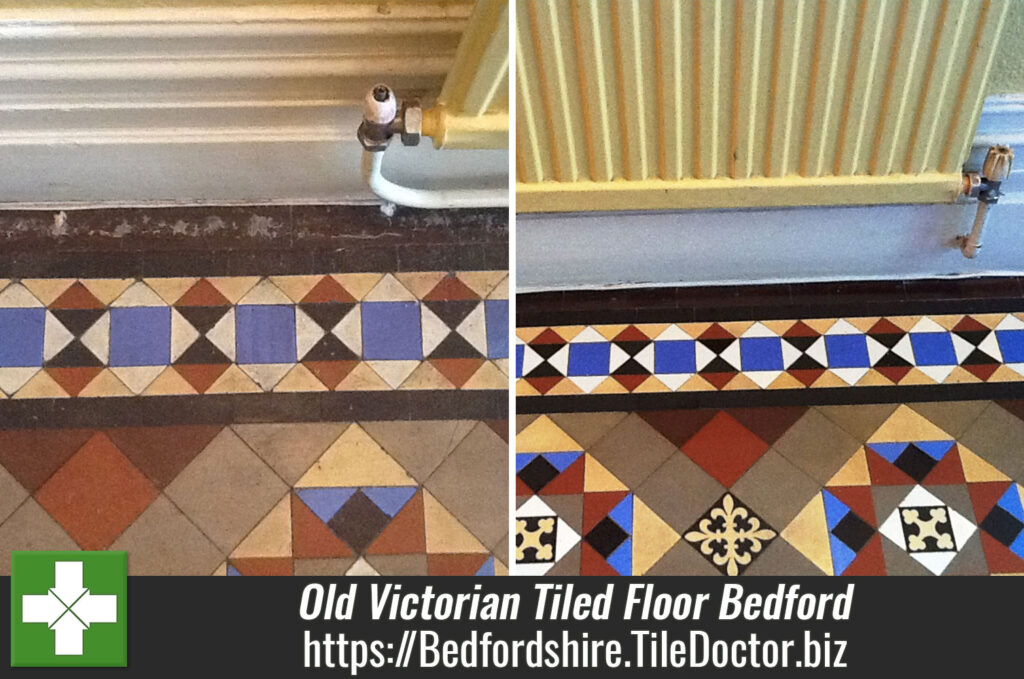
Old Victorian Tiled Floor Brought Back to Life in Bedford

Old Victorian Tiled Floor Brought Back to Life in Bedford

This customer from Bedford, the county town of one of England’s smallest counties Bedfordshire, called me out because they have bought a house and, upon lifting the glued down carpet, had discovered a beautiful Victorian tiled floor. They decided to call me in to see if this original feature could be restored to its former glory having already tried household products to remove the glue and clean the tiles with limited success.

We often find customers who discover old tiles under carpet or linoleum struggle with the standard cleaning products available in supermarket which are only designed for everyday cleaning. The products Tile Doctor sells are far stronger; naturally however to achieve the best results it also helps if you have the right equipment, knowledge and experience and that where we come in.

Victorian Tiled Floor Before Cleaning Bedford
I popped round to take a look at the floor and having tackled quite a few of these restorations before was confident we could restore the floor so a quote was given and the work was booked in for the next week.

Cleaning an Original Victorian Tiled Floor

My first course of action was to vacuum the floor to remove any loose debris. This gave me a better picture of the condition of the floor overall, and so I could assess how best to proceed. I opted for our tried and trusted method of applying a diluted solution of Tile Doctor Pro-Clean, which is a very reliable high alkaline cleaner suitable for all types of natural stone and tile. The solution was applied with a pump-up sprayer and left to dwell for 20 minutes to seep into the pores of the tile.

Victorian Tiled Floor During Cleaning Bedford
Next, I worked the solution into the tiles using a black scrubbing pad fitted to a rotary machine and hand brushes. The resulting cleaning slurry was then rinsed off – and I found that this had removed most of the glue and surface dirt. There were a few stubborn deposits of glue remaining, but I was able to remove them by using hand brushes and scrapers in combination with Tile Doctor Remove and Go, which is as its name suggest can remove most things including old sealers, epoxy grout haze, urethane coatings, synthetic finishes, adhesives and event paint.

Even after this there were still some patches of glue, so I decided to spray the whole floor with Remove and Go and worked it into the stubborn areas with brushes. I left it to dwell for 15 minutes and then rinsed the floor with a wet pick-up extraction machine. This did the job and the floor was left fresh and clean, ready to be sealed once it had dried.

Sealing an Original Victorian Tiled Floor

The floor was left to dry for several days, which is typically necessary for old tiled floors that don’t have a damp proof membrane installed. The customer wanted the floor to look traditional and therefore requested a matt finish. This was achieved by applying two coats of Tile Doctor Colour Grow, which is also breathable thereby allowing any damp to evaporate as gases through the sealer, without affecting the finish.

Victorian Tiled Floor After Cleaning Bedford
As I previously mentioned, floors of this age can sometimes have damp issues, so this sealer is ideal for these older floors. Colour Grow is an impregnating sealer, meaning it penetrates the pores of the stone to fill them and prevent trapped dirt. It also intensifies the colours in the tiles to really bring them to life.

Victorian Tiled Floor After Cleaning Bedford
The customer was shocked and amazed by the great results as she thought nothing could be done to restore such an old floor. Before leaving the property, I gave her some maintenance instructions to help her keep the floor looking its best in the future. Another satisfied customer!

Professional Restoration of an Old Victorian Tiled Floor in Bedfordshire

Old Victorian Tiled Floor Brought Back to Life in Bedford Read More »

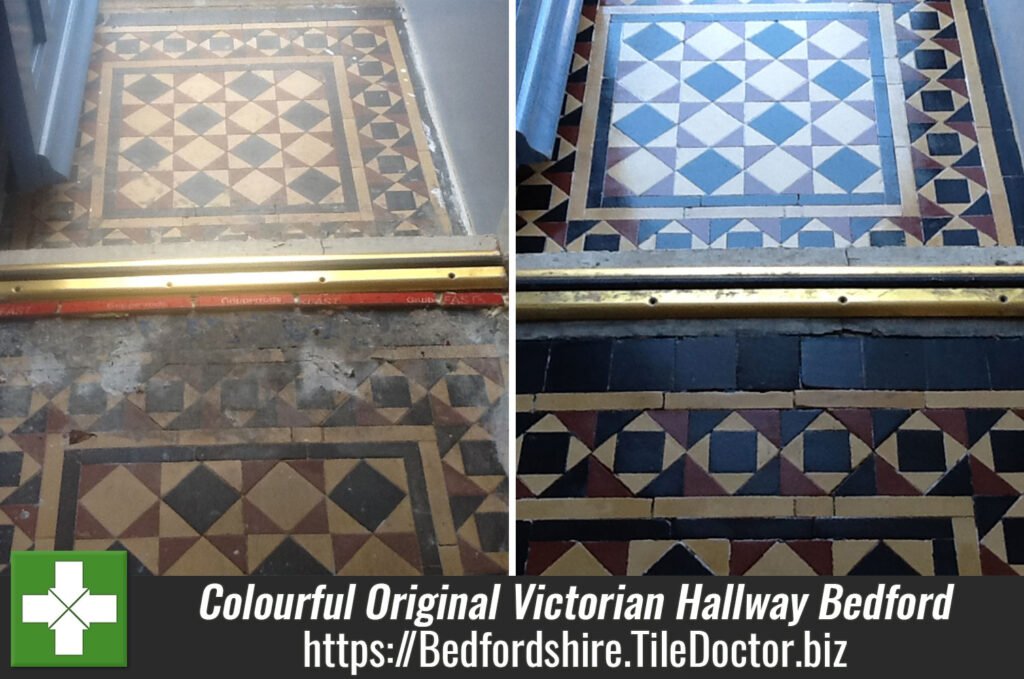
Colourful Original Victorian Tiled Hallway Restored to New in Bedford

Colourful Original Victorian Tiled Hallway Restored to New in Bedford

When you discover an old Victorian tiled floor underneath carpet, the first question that will probably pop into your mind is: can it be restored?

The answer, in the majority of cases, is yes. In fact, Tile Doctor has completed hundreds of Victorian tiled floor restorations. Victorian tiles have a timeless quality about them and are still popular for residential use even in the twenty first century.

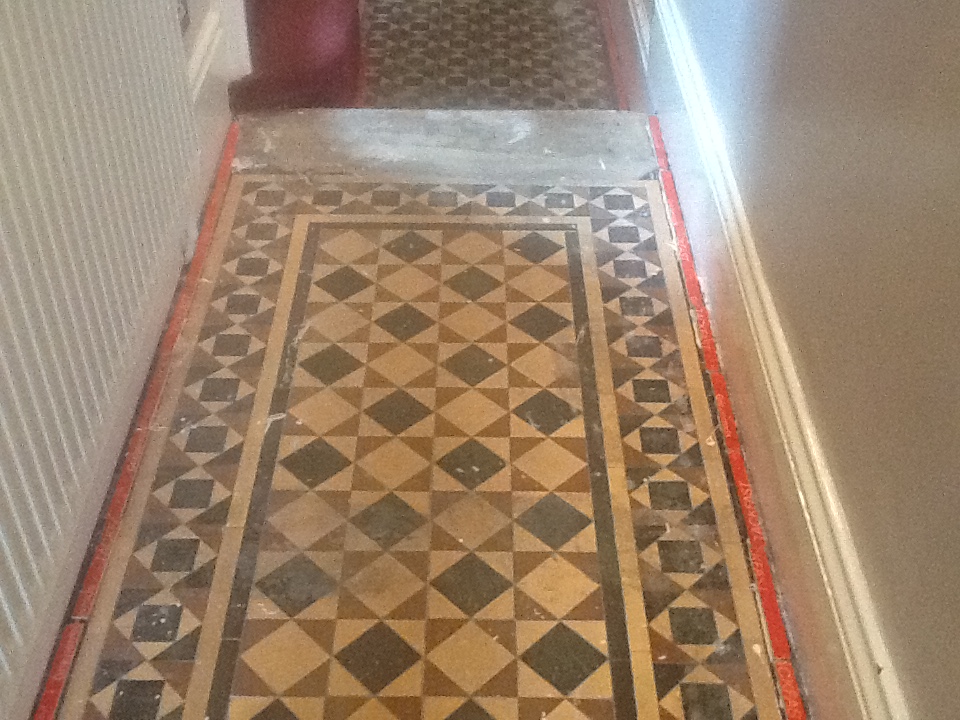
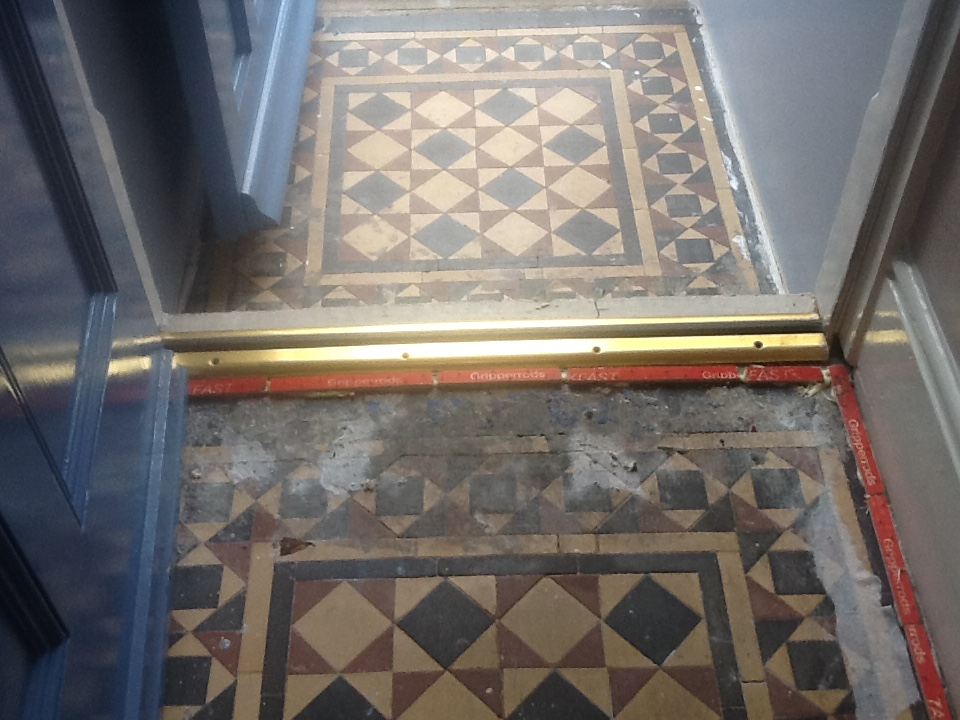
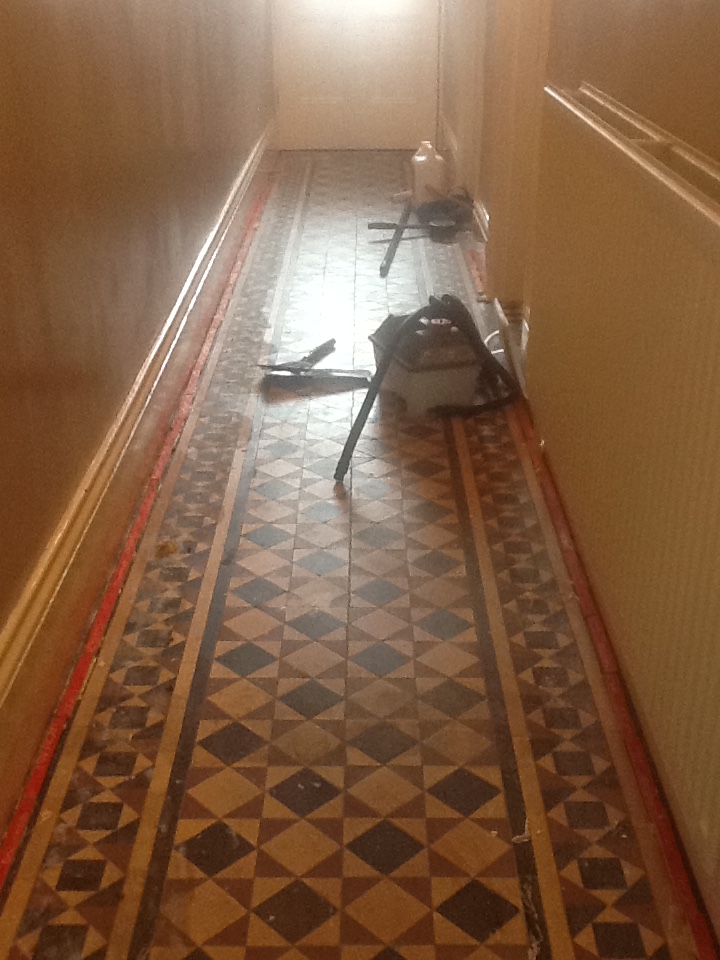
What you can usually expect upon lifting your carpet is for the tiles to be covered in carpet adhesives and grippers, as was the case with this particular example of a Victorian Tiles hallway floor at a property in Bedford. Sometimes you might also find paint splashes or other staining left over from decoration work. And, of course, the tiles will be dirty and in much need of a deep clean. These issues spoil the original appearance of the tiles, but with the right methods and products, a complete restoration can be achieved quickly and cost-effectively.

Victorian tiled floor Before Cleaning Bedford
My first task upon arriving at the proper was to carry out a site survey to address the condition of the tiles, before running a quick test clean on a small area of the floor. The result was good and so I was confident that I could achieve a high-quality restoration for the client.

Victorian tiled floor Before Cleaning Bedford

Cleaning Original Victorian Tiles

A quote was issued and accepted, and the work was booked in at a date that was convenient for the customer.

Returning to the property, my first course of action was to mix a strong dilution of Tile Doctor Pro Clean, which is a powerful alkaline cleaner safe to use on natural stone, with hot water. This cleaning solution was sprayed along all edges of the floor loosen the glue securing the carpet grippers. I then successfully removed the adhesive carefully using handheld tools to avoid damaging any tiles.

Victorian tiled floor Before Cleaning Bedford
Once this was done, I applied Tile Doctor Remove and Go, scrubbing it into the tiles with a rotary machine. This product is designed to remove heavy soiling, paint splashes and old waxes and sealers. The soiled solution was then extracted using a wet vacuum and stubborn areas re-treated until I was satisfied the floor was clean.

The entire floor was then given a thorough rinse with water to remove any trace of cleaning products and extracted using a wet vax machine.

Sealing Original Victorian Tiles

The floor was allowed to dry for several days before I was able to return to seal the tiles. It’s always important to leave significant time for the floor to dry because any moisture left over can impact the performance of the sealer.

The choice of sealer was Tile Doctor Seal and Go Extra, which provides robust protection against dirt and stains, with a light sheen finish. I chose this sealer not only because the customer wanted a light sheen finish, but also because this particular sealer is fully breathable. Dampness can sometimes be an issue with old Victorian and Quarry tiles which were installed before damp proof membranes became standard.

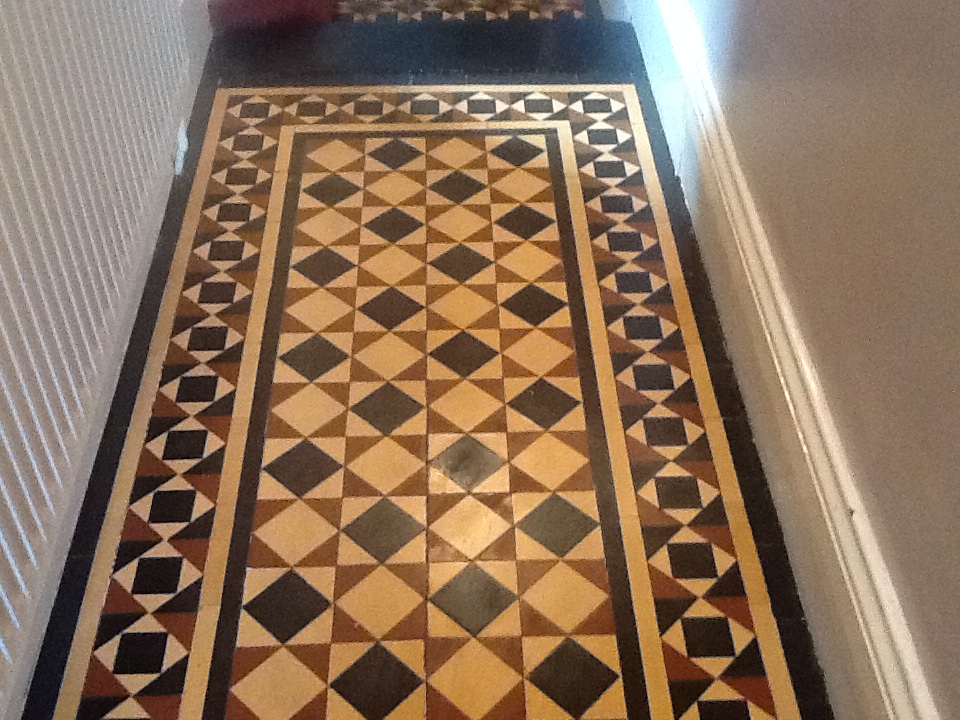
Victorian tiled floor After Cleaning Bedford Victorian tiled floor After Cleaning Bedford

The transformation achieved within the space of a week was quite incredible and the colours in the tile have really come through.
Another satisfied customer!

Victorian tiled floor After Cleaning Bedford
 

Professional Restoration of an Original Victorian Tiled Floor in Bedfordshire

Colourful Original Victorian Tiled Hallway Restored to New in Bedford Read More »

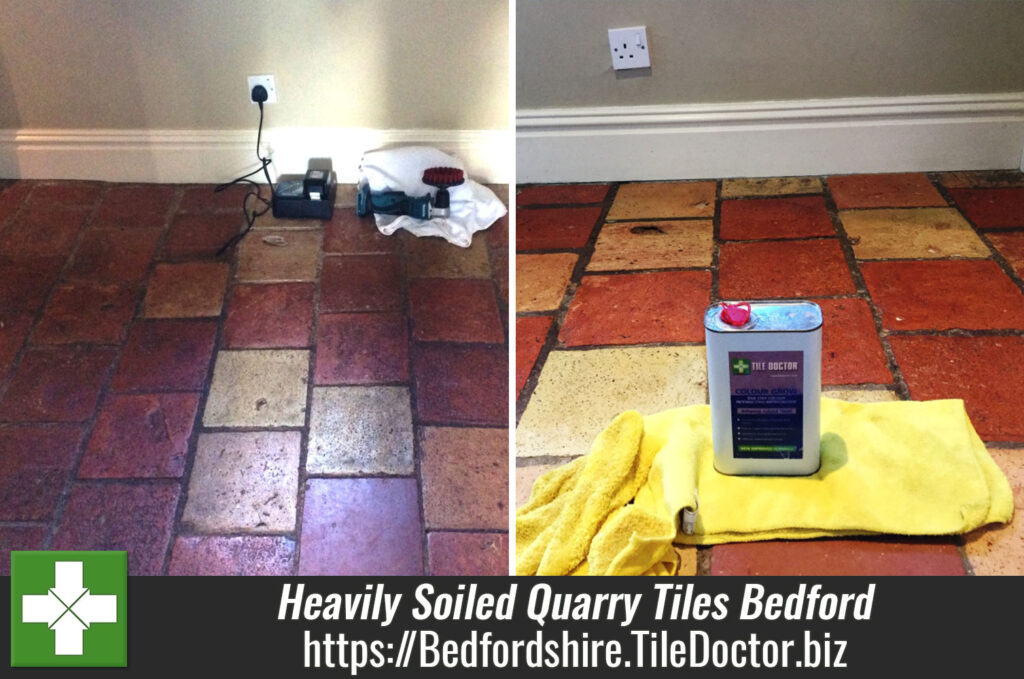
Heavily Soiled Quarry Tiles Deep Cleaned and Sealed in Bedford

Heavily Soiled Quarry Tiles Deep Cleaned and Sealed in Bedford

What causes a tiled floor to become dull and discoloured? Typically, it’s a combination of heavy soil build-up and an ineffective approach to cleaning and maintenance. Such was the case with this heavily soiled Quarry tiled hallway floor in Bedford.

A further problem was that the tiles were very pitted and at some point, in the past they had been filled with grout, additionally, when I took a closer inspection of tiles, I established that there was a wax sealer present on the floor that has bend topped up from time to time – without the tiles being deep cleaned. This has caused an accumulation of soil trapped between multiple layers of wax. The result? Extremely dull and unattractive Quarry tiles that the customer was desperate to get back to looking their best.

Quarry tiles before cleaning Bedford

Cleaning a Very Dull and Dirty Quarry Tiled Hallway

My first course of action was to vacuum the floor thoroughly to remove any small quantities of grit or loose debris. I then masked up the carpet and radiator to protect them before mixing up a strong dilution of Tile Doctor Pro Clean mixed with hot water. This was then applied to the surface of the floor in small areas of three square metres each. The high alkaline cleaning product was left to dwell for a short period before I agitated the tiles with a black stripping pad to remove the heavy soil. The resulting cleaning slurry was extracted with a wet vax machine.

This cleaning process was repeated throughout the entire area. Inaccessible places, such as under the radiator and stairs, were manually cleaned using hand brushes. I then dried the floor with a fan for 30 minutes, before mopping on a solution of the acid-based Tile Doctor Grout Clean Up to neutralise the Pro Clean and removing the dirt on the grout lines with the hand brushes.

Sealing a Quarry Tiled Hallway

The area was allowed to dry completely overnight. I returned the following day and applied two different types of sealer in two separate test areas so the customer could get a better idea of the final effect that would be achieved.

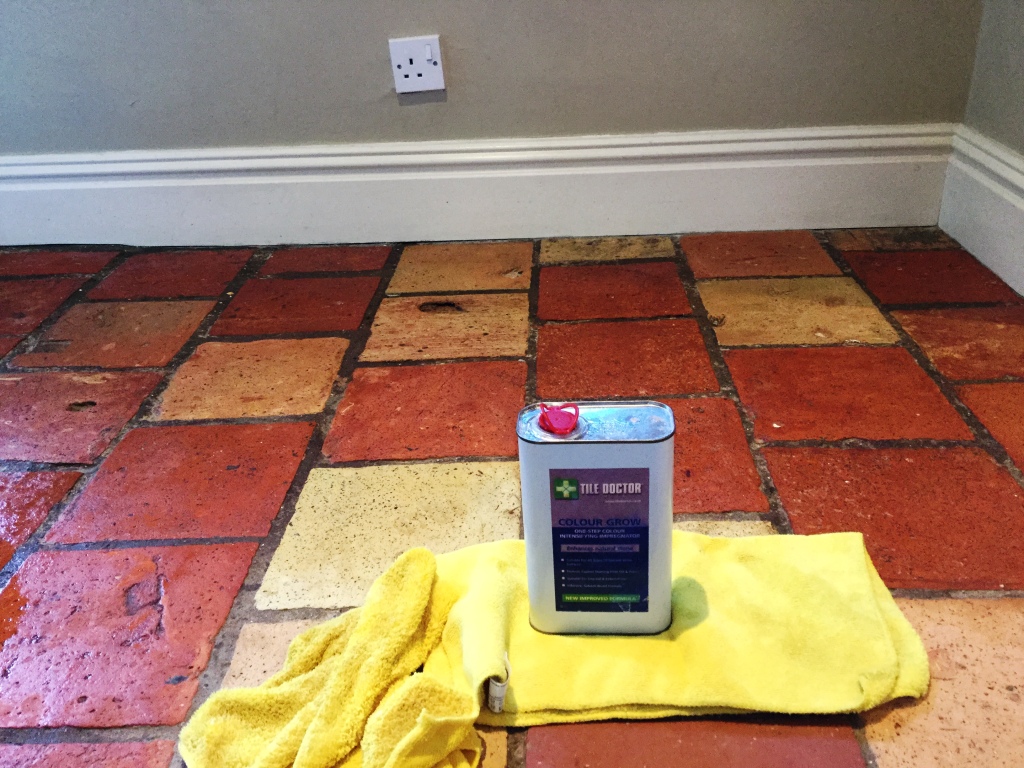
The customer could’ve opted for Tile Doctor Seal and Go, which is a topical sealer that provides a high quality, durable low-sheen finish. However, after further discussion, it was decided that the best product would be Tile Doctor Colour Grow, which is an impregnating sealer that penetrates the tiles and provides a more natural finish, emphasising the colours in the stone.

Quarry tiles after cleaning and sealing Bedford
As you can see from the photos above, a deep clean and fresh seal truly worked wonders for these Quarry tiles. Both myself and the customer were very happy with the outcome of the work.

Deep Cleaning of Dirty and Dull Quarry Tiled Hallway in Bedfordshire

Heavily Soiled Quarry Tiles Deep Cleaned and Sealed in Bedford Read More »

Brick Driveway Pressure Washed and Sealed in Pertenhall

Brick Driveway Pressure Washed and Sealed in Pertenhall

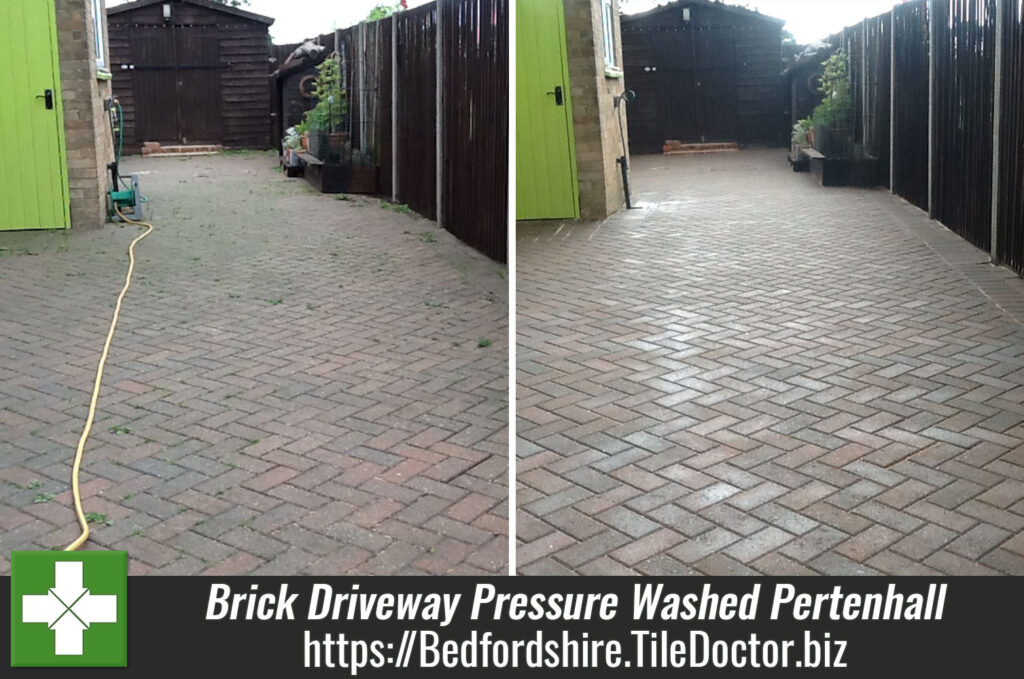
While most of our work involves the restoration of interior tiles, our equipment is also suitable for exterior stonework, including driveways and patios. Here’s a quick example of a brick driveway I restored recently in the old parish of Pertenhall, famous for its old Norman-age church, near Bedford.

The driveway hadn’t been cleaned in a long time and had a serious problem with overgrown weeds and dirt. Needless to say, the property owner was keen to give it a new lease of life and this is something I would highly recommend if you’re looking to sell your property as improving curb appeal will ensure you make a good first impression.

Driveway before cleaning Pertenhall

Cleaning and Sealing a Brick Tiled Driveway

The restoration would take three visits to the property. On the first visit I tackled the weeds head on by applying a strong weed killer which needed to work its magic over a period of two weeks. When I returned to the property the second time the weeds had died away and the driveway was ready to be pressure washed with my industrial, petrol-powered pressure washer.

I returned to the property for a third and final time a few days later on a sunny day to find that the driveway had completely dried out. To finish the restoration, I applied some fresh kiln-dried sand to the gaps between the bricks and applied Tile Doctor Seal & Go Extra, a sealer which is approved for outside use.

Driveway after cleaning Pertenhall
The customer was not only happy with the refreshed appearance of the driveway, but also reassured that the weeds would be kept at bay for quite some time. This is because the kiln dried sand and sealant prevents seeds falling between the brick blocks and taking root.

Before leaving I advised the owner to brush and hosed down the driveway monthly as this will ensure its appearance is maintained for much longer.

Brick Driveway Reconditioned in Bedforshire

Brick Driveway Pressure Washed and Sealed in Pertenhall Read More »

Very Old Quarry Fireplace Deep Cleaned and Sealed in Bedford

Very Old Quarry Fireplace Deep Cleaned and Sealed in Bedford

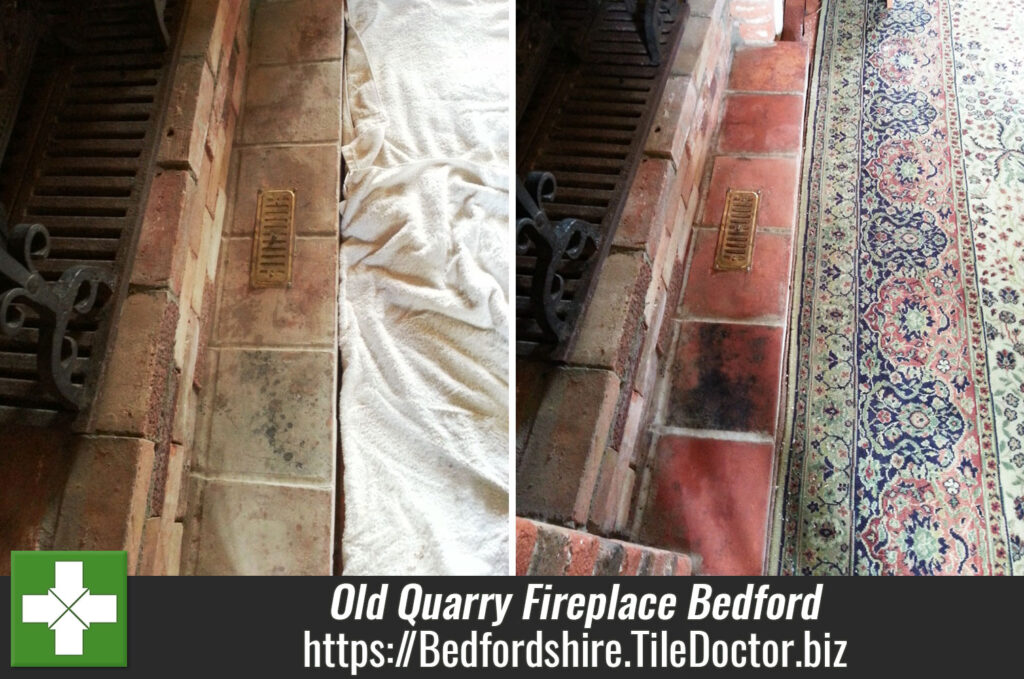
The oldest properties often have the most interesting tiled features and this Quarry Tiled Fireplace was a fine example. The customer lived in a quaint old cottage just outside the main town centre of Bedford and contacted us about restoring their fantastic Quarry tiled fireplace. While the customer knew that the cottage itself was over 200 years old, they had no idea whether or not the fireplace is an original feature.

However, it’s safe to say that the fireplace is very old in its own right, and that it had been a long time since it had experienced any kind of professional maintenance. It goes without saying that as any kind of tiles get older they will need more frequent care to keep them looking at their best. Here, the Quarry tiles desperately needed cleaning up as they were covered in old candle wax and what looked to be several years’ worth of general dirt. This had significant dulled the natural shades in the stone, leaving it looking lifeless and unappealing. The tiles would also require a fresh seal to ensure protection against muck in the future, and to help restore the colour to the stone.

Quarry Tiled Fireplace before cleaning and sealing Bedford

Cleaning an Old Quarry Tiled Fireplace

Firstly, I applied Tile Doctor Oxy-Gel tile cleaner, which is particularly effective on tricky areas as being in a gel form it adheres better to non-horizontal areas. It was left it to dwell on the tiles for around twenty minutes so it could penetrate into the pores and get to work lifting out and dissolving the dirt that had been trapped in there over the years . Oxy-Gel is suitable for use on a wide range of natural stone tiles, including Quarry, Travertine and Slate. In this situation it cut through and removed most of the candlewax quite easily, and softened the stubborn residue to a point where I could easily remove the rest manually with handheld scrappers.

I then left area it to dry, with an air mover installed to reduce drying time. The advantage of using a gel product is that uses a smaller amount of moisture than a standard liquid cleaner, and therefore allows the tile to dry – and to be sealed – quicker; and in this case we were able to seal the same day where-as normally we would have to wait until the next day.

Sealing an Old Quarry Tiled Fireplace

Once the tiles were completely dry, I sealed the fireplace with Tile Doctor Colour Grow which is an impregnating sealer that fills the pores of the stone to prevent dirt and general muck from becoming ingrained, making the tiles much easier to keep clean in the long-term.

The added benefit of Colour Grow is that – as its name suggests – it emphasises the natural colours in the stone. This was something that the Quarry fireplace was desperately in need of, and the Colour a Grow quickly got the job done!

Quarry Tiled Fireplace after cleaning and sealing Bedford
The customer was very pleased with the finished results. The clean removed years’ worth of muck, while the fresh seal brought out the natural beauty in the Quarry tiles and, at the same time, will protect the tiles on future candle-lit evenings.

Professional Restoration of an old and Dirty Quarry Tiled Fireplace in Bedford

Very Old Quarry Fireplace Deep Cleaned and Sealed in Bedford Read More »

Victorian Brick floor tile restoration in Colmworth

Victorian Brick floor tile restoration in Colmworth

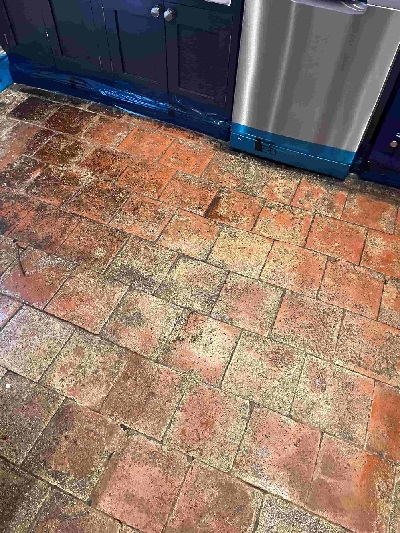
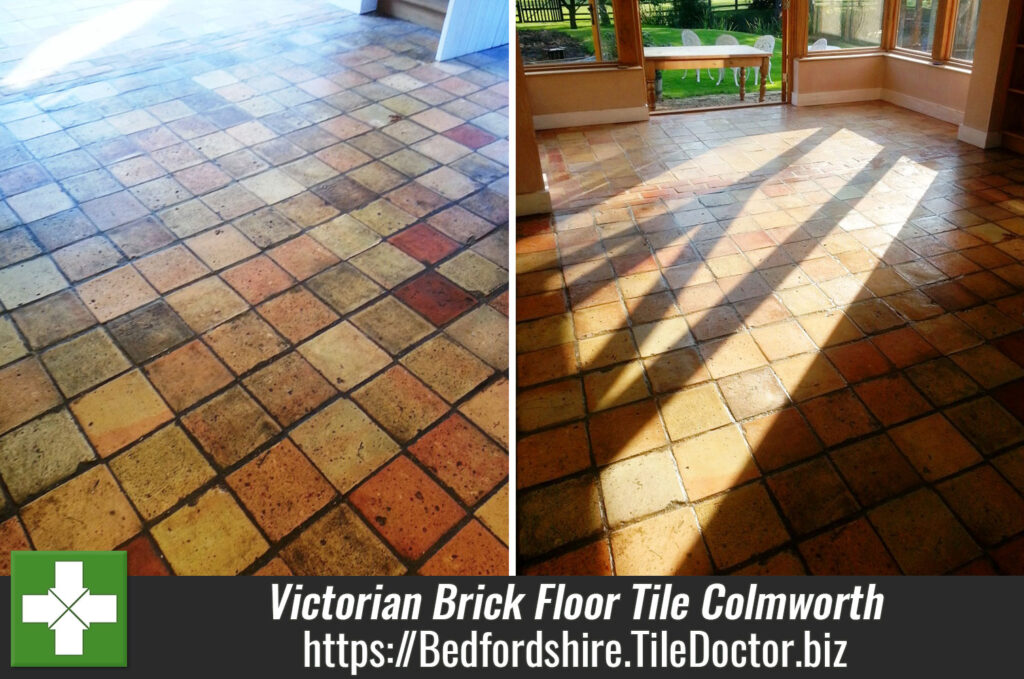
The photographs below are from a Victorian brick floor in the kitchen and conservatory of a busy farm house in the old village of Colmworth. Any sealer that had been applied to the floor in the past had long since worn off and without a barrier in place dirt had become ingrained into the pores of the brick making it appear worn, dirty and very difficult to clean.

Victorian Brick Floor Tiles-Before Restoration in Colmworth

Deep Cleaning Victorian Brick Tiles

To get the kitchen floor clean I applied a strong dilution of Tile Doctor Pro-Clean to the floor and then left it to soak in for around twenty minutes; this long dwell times allows the product to get to work on the dirt. I then agitated the floor with a black stripping pad fitted to a rotary machine rinsing the floor with water afterwards which was extracted with a wet vacuum and then repeating the process where necessary.

Once cleaned and rinsed thoroughly the floor was left to dry and I moved onto the next job tackling the conservatory floor in a new extension where the tiles had been chosen to match the kitchen.

There were signs of efflorescence on some of the brick tiles along with concrete residue which I was able to remove using Tile Doctor Grout Clean-Up which is an acid, and once it had done its job the conservatory tiles were given a thorough rinse to remove any trace and given a quick clean using a weak dilution of Pro-Clean.

Sealing Victorian Brick Tiles

After leaving the floor to dry for several days we returned and sealed the floor with several coats of Tile Doctor Seal and Go until the floor was fully sealed and the desired finish has been achieved.

Victorian Brick Floor Tiles-After Restoration in Colmworth

Restoring the Appearance of Victorian Brick Tiles in a Bedforshire Farm House

Victorian Brick floor tile restoration in Colmworth Read More »

Limescale Treated on Slate Bathroom Tiles Ravenden Before After

Dealing with Limescale Stains on a Slate Tiled Bathroom in Ravensden

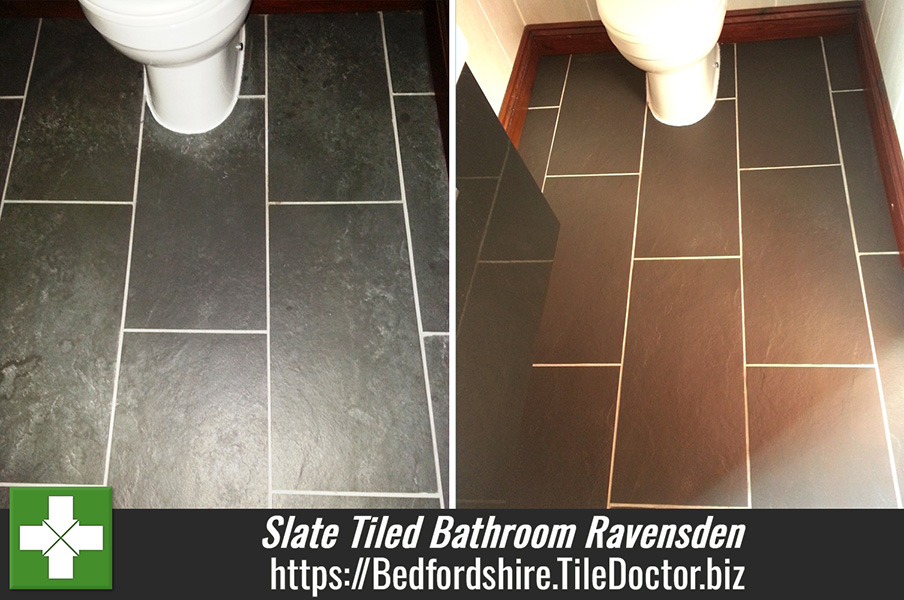
Our client in Ravensden had a rough slate tiled floor fitted into her en-suite bathroom approximately six years ago. The tiles were never sealed and due to the hard water in the area, plus shower products the floor developed a white crust in areas.

Limescale Treated on Slate Bathroom Tiles Ravenden Before Limescale Treated on Slate Bathroom Tiles Ravenden Before

Tile doctor deals with tile problems across the UK everyday and leads the way in developing new techniques to deal with tile related issues and so I was confident of finding a solution that could resolve the problem with a single visit.

Dealing with Limescale on a Slate tiled floor

Mindful of damp levels in the slate we used a small coarse 200 grit Tile Doctor Diamond pad on a six-inch hand held machine to take off the lime scale. This cleaned most of it off but in corners and some deep rough areas where the pad could not access were spot treated using Tile Doctor Acid Gel which was left to sit and dwell for 20 minutes then rinsed off the floor.

Sealing a Slate tiled floor

A turbo fan was used to speed up the drying of the floor and within a couple of hours it was dry enough to seal for which we used a couple of coats of Tile Doctor Colour Grow which is an impregnating sealer that seeps into the pores if the Slate protecting it from within and enhancing the look of the stone in the process.

Limescale Treated on Slate Bathroom Tiles Ravenden After Limescale Treated on Slate Bathroom Tiles Ravenden After


Slate Floor Problems Resolved in Bedfordshire

Dealing with Limescale Stains on a Slate Tiled Bathroom in Ravensden Read More »

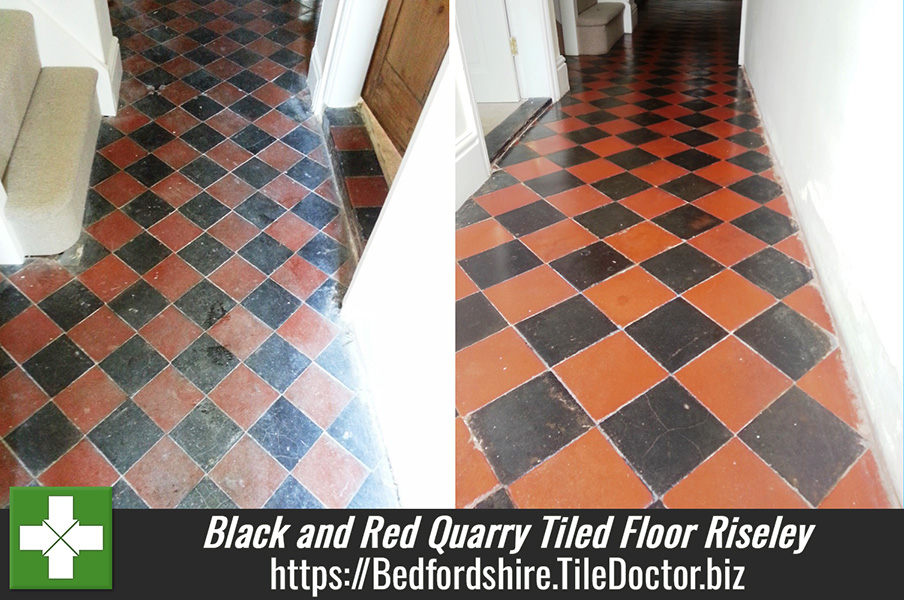
Red and Black Quarry Tiles Riseley after cleaning

Black and Red Quarry Tiled Ffloor Restored in Riseley

Details below of a restorative clean and seal that I recently completed on a Quarry tiled hallway at a house in the small village of Riseley, North Bedfordshire.

The floor was a mix of fantastic black and red tiles; however, it had lost its character after a long period without professional maintenance. My client commissioned me to strip off the old sealer from the floor and replace it, but not before providing a thorough clean, including tackling some adhesive staining and inherent grout haze.

Red and Black Quarry Tiles Riseley before cleaning

Cleaning a Quarry tiled floor

The first task involved mixing our high alkaline cleaner, known as Tile Doctor Pro-Clean, with water to form a strong solution. The solution was applied to the tiled floor and left to dwell for a short period. This dwelling time allows for the Pro-Clean to seep into the stone to get underneath the ingrained dirt and lift it out. Pro-Clean also contains stripping properties, and thus helped to break down the old (and now ineffectual) sealer.

After completing this initial clean I rinsed the floor using a standard mop and bucket method. With the old sealer removed, it became evident that there was also plaster residue marking the tiles, as well as inherent grout haze on the surface of the tile probably from the original installation. To tack these problems I used Tile Doctor Grout Clean-Up, which is an acid-based cleaner that dissolves the adhesive and the grout. Being an acid you have to be careful and ensure the floor is rinsed thoroughly after use and if you’re considering using this product yourself read the label and make sure you use the right protective equipment.

Sealing a Quarry tiled floor

After the floor was thoroughly rinsed with water it was dried as much as possible using a wet vacuum which literally sucks the water off the floor. The floor was then left to dry for four days, with the help of several air movers. By the time I returned to the house, the floor was completely dry and ready to take the seal.

I opted to use a combination of sealers, including one coat of our colour enhancing, impregnating sealer, known as Colour Grow, followed by three coats of Tile Doctor Seal & Go to provide a truly robust and aesthetically pleasing surface seal.

Red and Black Quarry Tiles Riseley after cleaning
The photographs demonstrate the finished results better than words can and I think you will agree the floor is quite transformed.

Resolving Quarry Tiled Flooring issues in Bedfordshire

Black and Red Quarry Tiled Ffloor Restored in Riseley Read More »

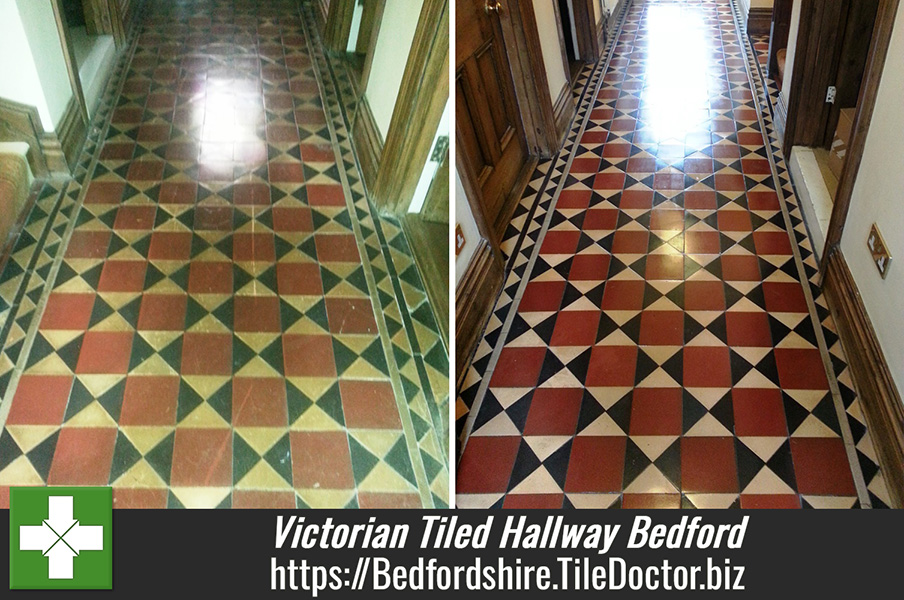
Victorian Tiles before after Cleaning in Bedford

Victorian Tiled Hallway Restored in Bedford

Recently I was contacted by a man in the town of Bedford who was worried that he had damaged his Victorian tiled hallway as a result of dragging a piano across the floor. I went round to the property to get a better look at the problem and, on closer inspection, realised that the tiles were actually fine; however, the piano had torn through the old surface seal.

The 150-year old tiles, dating back – as the name suggests – to the reign of Queen Victoria, had been poorly sealed and additionally had not been maintained correctly with the appropriate cleaning products. I was commissioned to remove the old sealer, clean and re-seal in order to restore this fantastic floor to its former glory.

Victorian Tiles before Cleaning in Bedford

Method for cleaning Victorian tiles

My first task was to mix a solution of Tile Doctor Pro-Clean and water, which was then spread across the floor. Pro-Clean is a high alkaline cleaner which also contains stripping properties and this helped to break down the old, damaged sealer. The solution was left to dwell for approximately 20 minutes, giving it time to seep into the stone to get underneath, and lift out, any ingrained dirt. Pro-Clean was worked into the tiles using a heavy low speed rotary machine fitted with a black pad.

Once cleaned and stripped, we rinsed the floor using plain, clean water to neutralise the high alkaline Pro-Clean and the removed the resulting slurry using a wet-vac machine.

At this point I noticed that the white/magnolia tiles were particularly well worn and still very dirty and in need of further cleaning. Around this time Tile Doctor had also been discussing the successful use of Burnishing Pads (normally used on polished stone) on Victorian Tiles so I hand burnished the most stained tiles with a small 6 inch diamond encrusted burnishing pad with a little water to help lubricate the process. Following this, I rinsed the entire floor once again.

Method for sealing Victorian tiles

After leaving the floor to dry for four days, I returned to the house to seal the tiles opting to apply a single coat of Tile Doctor Colour Grow impregnating sealer first followed up with four coats of Tile Doctor Seal & Go. This combination of sealers provides a durable internal and surface stain protection whilst lifting the colours and adding a nice subtle sheen finish.

Victorian Tiles after Cleaning in Bedford
Once dried and cured, the floor was buffed using micro-fibre clothes to further enhance the appearance of the tiles further. My client was very pleased with the results, and couldn’t believe it was possible to get a floor that was so old appear brand new! The floor will dull with wear so I advised my client on the benefits of a regular maintenance plan going forward to ensure this great flooring feature remains in top condition.

Professional tile cleaning and sealing for Victorian tiled hallway restoration in Bedford

Victorian Tiled Hallway Restored in Bedford Read More »

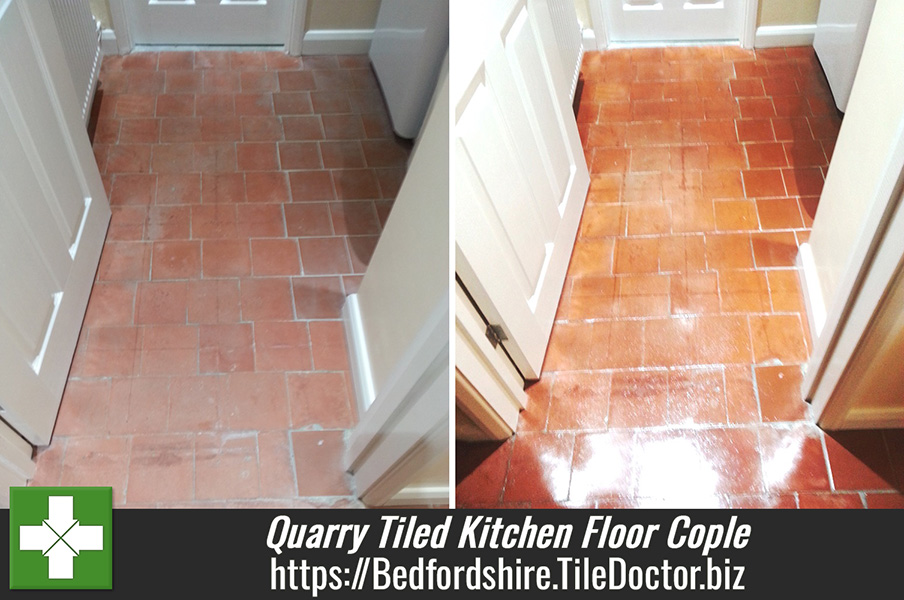
Quarry tiles in Cople Before After Cleaning

Quarry Tiled Kitchen Floor Resealed in Cople

This was an unusual request in that this customer, in the small Bedfordshire village of Cople, had her Kitchen Quarry tiled floor cleaned and sealed six months earlier by another company. The sealer had come off and it soon became evident that after the work had been carried out the client was ill advised as to the correct maintenance of her floor. The cleaning product left by the previous company was totally unsuitable and over the course of six months she had managed in fact to slowly strip the sealer off of the tiles.

I soon realised the problem and advised that the only solution would be to strip any remaining sealer off the floor and re-seal, it’s generally not good practice to apply a different sealer on top of an existing sealer as there can be compatibility issues and the floor may look different in places where there are more layers of seal.

Quarry tiles in Cople Before Cleaning Quarry tiles in Cople Before Cleaning

Cleaning and Stripping Quarry Tiles

I used a strong dilution of Tile Doctor Pro-Clean to strip any remaining sealer off the tiles and clean them in the process, this involves spreading the solution over the tiles, allow it to dwell and soak in and then scrubbing the solution into the floor using a rotary machine fitted with a black scrubbing pad. The floor was then rinsed with water applied with a mop and bucket and the soiled water extracted using a wet vacuum. One the floor was clean I noticed there was evidence of concrete dust and grout haze on the surface of the tiles from when they were installed so I applied a another Tile Doctor product called Grout Clean-up to remove it, again the floor was thoroughly rinsed with water which was extracted the floor dried using air movers.

Sealing Quarry Tiles

Tiled floors need to be dry before sealing and so I left this floor for four days to allow enough time for it to thoroughly dry out before returning to seal it. Choice of sealer for this floor was four coats of Tile Doctor Seal and Go which is a water based sealer so it doesn’t leave a smell and additionally adds a nice subtle shine to the floor. The difference was transformational as the sealer really does bring out the best in the quarry tiles.

Before leaving we have provided the customer a bottle of Tile Doctor Neutral Tile Cleaner which is the correct cleaning agent to maintain a sealed floor. It has a neutral PH formula so it won’t erode the sealer like many of the acidic floor cleaning products you find in the supermarket which are really only meant for use on Vinyl or Ceramic tiles.

Quarry tiles in Cople After Cleaning Quarry tiles in Cople After Cleaning


Resealing Quarry Tiles in a Bedfordshire Kitchen

Quarry Tiled Kitchen Floor Resealed in Cople Read More »

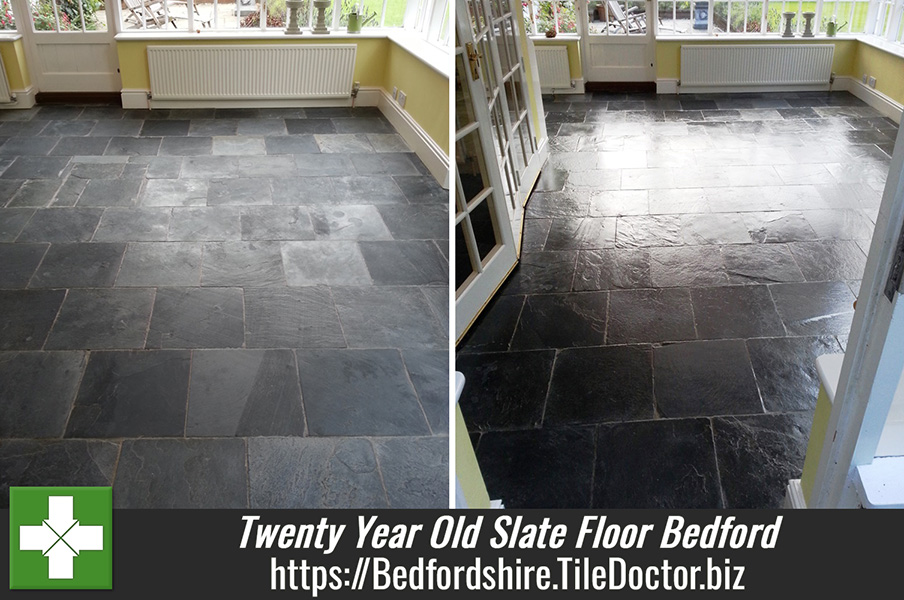
Slate Tiled Floor Bedford Before After Cleaning and sealing Bedford

Cleaning and Sealing a Twenty Year Old Slate Floor in Bedford

Every now and again, I get called to work on tiled floors which have were laid some time ago and not properly maintained in a long time, as was the case with this customer in the town of Bedford at the heart of Bedfordshire. They had a twenty year old Slate tiled floor that was now in need of a thorough clean and a re-seal.

Cleaning a Slate tiled floor

As you can see from the photos, the floor was very much worse for wear in some areas, with the tiles looking very dull and dirty. To clean the tiles I used a combination of a steamer and a solution of Tile Doctor Pro-Clean, a high alkaline cleaner suitable for use on many different types of natural stone floor, including Slate, Limestone, and Victorian tile – just to name a few.

The solution is scrubbed into the tiles to lift out the ingrained dirt and stains. Concentrated Pro-Clean is also strong enough to strip off the old sealer from the floor. After completing the clean and inspecting the tiles to ensure all of the problem areas had been successfully tended to, I rinsed the floor thoroughly with water to remove any trace of cleaning product. After rinsing the floor in such a way it is important to leave plenty of time for it to dry before sealing, so I left the house for 24 hours before returning.

Slate Tiled Floor Bedford after Cleaning and before sealing

Sealing a Slate tiled floor

Upon my return to the house, I inspected the floor to ensure it had dried completely, as any excess moisture remaining of the tiles has the potential to damage the performance of the sealer. The sealer I used was the new and improved Tile Doctor Seal & Go known as Seal and Go Extra, which has an acrylic base and a much higher content of solid. This means that when the sealer dries it is able to provide an even better level of protection for the stone.

I applied several coats of Seal & Go Extra to give the Slate tiles a stain resistant surface seal and the high quality finish the client had requested. Seal & Go Extra is suitable for use on internal and external, unsealed porous surfaces such as textured Quarry, Sandstone, Victorian tile and, of course, Slate.

Slate Tiled Floor Bedford After Cleaning and sealing
 

Old Slate Floor brought back to life in Bedfordshire

Cleaning and Sealing a Twenty Year Old Slate Floor in Bedford Read More »

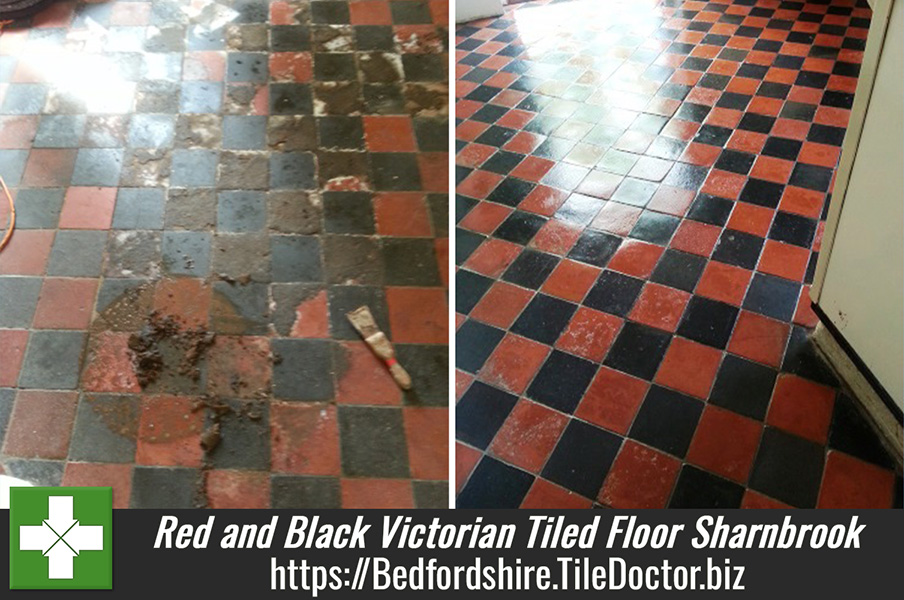
Victorian Tiled Floor Before After Restoration in Sharnbrook

Red and Black Victorian Tiled Floor Restored in Sharnbrook

We were asked to restore a beautiful Victorian tiled floor at a house in the small village of Sharnbrook, Bedfordshire. The floor had been badly treated for many years until new occupiers decided to restore it.

The area comprised of a Pantry, Loo, Lobby, Dining room, Kitchen and Conservatory, we had several problems to deal with including some tiles that were loose, some had cement on them and the dining room floor had the remnants of a coir rug stuck to the surface.

Victorian Tiled Floor Before Restoration in Sharnbrook

Cleaning Old Quarry Tiles

Having moved all the furniture we started from the far end pre-treating the coir matted dining room tiles by soaking them in a strong dilution of Tile Doctor Pro-Clean; leaving them to soak in this way would soften up the matting and enabled us to remove the debris more easily with a scrapper by the time we got to the dining room.

We then started on the rest of the floor again using a strong dilution of Tile Doctor Pro-Clean which was left to dwell on the tile for ten minutes before being worked in using a scrubbing pad until any remaining old sealer was stripped off the tile the tiles were clean.

For the tiles which were covered in cement we treated them with an acid rinse using Tile Doctor Grout Clean-Up, being an acid you have to take care and wear appropriate personal protection and not to leave the acid on the tile for too long. It was satisfying however to watch the cement fizz away to reveal the beautiful tile below.

Once everything was stripped and the floor clean we gave the tiles a thorough rinse and extracted as much water from the floor as possible before installing a number of and air movers to speed up the drying process.

Whilst the floor was drying our attention moved onto the replacement of the lose tiles and re-adhering them to the floor. This was a straight forward job using tile adhesive and matching grout and we then left to allow the floor to dry out thoroughly.

Victorian Tiled Floor After Deep Cleaning in Sharnbrook

Sealing Quarry Tiles

We returned seven days later and took more damp readings, these all read ok so we proceeded to seal the floor. First we used a coat of Tile Doctor Colour Grow which is an impregnating sealer the gets into the pores of the tile protecting it from within and also enhancing the colours in the tile in the process; this was then followed with four coats of Tile Doctor Seal and Go to leave a high shine finish as requested by the client.

Victorian Tiled Floor After Restoration in Sharnbrook
 

Restoring and repairing old Victorian Quarry Tiles in Bedfordshire

Red and Black Victorian Tiled Floor Restored in Sharnbrook Read More »

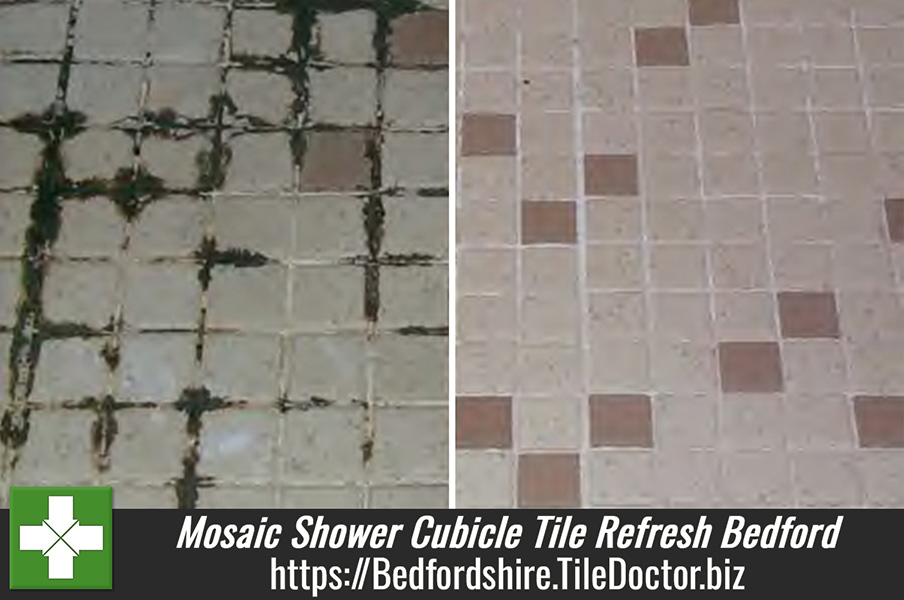
Mosaic Shower Tile Refresh in Bedford Before and After

Mosaic Shower Cubicle Tile Refresh in Bedford

The before and after photograph below is from a job we did in a Shower Cubicle tiled with small square Mosaic tiles at a house in Bedford. As you can see from the photograph the grout had become stained with mould and mildew growth which had become quite bad and moved onto the surface of the tile.

Cleaning Mosaic Tiles

To resolve the problem a strong dilution of Tile Doctor Pro-Clean was scrubbed into the tile and grout by hand using a stiff brush. It’s best to let the Pro-Clean soak into the tile and grout for ten minutes before working in and to help the solution stick on vertical surfaces it’s best to decant the Pro-Clean into a spray bottle and spray it onto the surface of the tile, this allows it to mix with air making it lighter and enabling it to stick to the surface instead of running off.

Mosaic Shower Tile Refresh in Bedford Before and After
The mould and mildew had become quite ingrained and had managed to get quite a foothold in the grout which due to its cementitious nature is actually porous near the surface. As a result the tiles were proving very had to get clean and so working in sections the process was repeated numerous times requiring a lot of physical effort and Pro-Clean before we were happy with the results.

Removing Mould and Mildew from Mosaic Shower Tiles in Bedford

Mosaic Shower Cubicle Tile Refresh in Bedford Read More »

Deep Cleaning Quarry Tiles in Bedford After

Deeping Cleaning Quarry Tiles Floor in Bedford

This floor was another case of builders failing to protect the Quarry Tiled Floor when they were working at this house in Bedford, this is certainly not un-typical of plasters considering the number of messy floors we have had to clean up previously. I guess in some ways we shouldn’t complain as they are keeping us busy but it was my floor I would be quite upset.

Deep Cleaning Quarry Tiles

To get rid of the plaster I applied a solution of Tile Doctor Grout Clean-up which is an acid based product designed to remove grout from the surface of tiles but works equally well on cement, plaster and other mineral deposits such as effloresce and rust. Working in sections the Grout Clean-up was applied, scrubbed in and then washed off, being an acid it’s not advised to leave it on the tile for too long.

Once the plaster was dealt with the whole floor including the tiles and grout was given a good clean using Tile Doctor Pro-Clean which is a strong alkaline product that’s safe to use on Tile, Stone and Grout. For best results leave it to soak into the tile for twenty minutes before giving the tiles a good scrub.

Once the tiles were clean the floor was given a good rinse with clean water to remove any remaining chemical and neutralise the floor before sealing; a wet vacuum was used to remove as much water from the floor as possible so it could dry faster.

Deep Cleaning Quarry Tiles in Bedford Before Deep Cleaning Quarry Tiles in Bedford After

Sealing Quarry Tiles

We left the floor to dry overnight and came back the next day to seal it using four coats of Tile Doctor Seal and Go sealer which adds a nice sheen to the floor as well as providing long term stain protection. The photographs above show the transformation of the floor and certainly the customer was very happy with the result.

Removing Plaster from Quarry Tiles in Bedfordshire

Deeping Cleaning Quarry Tiles Floor in Bedford Read More »

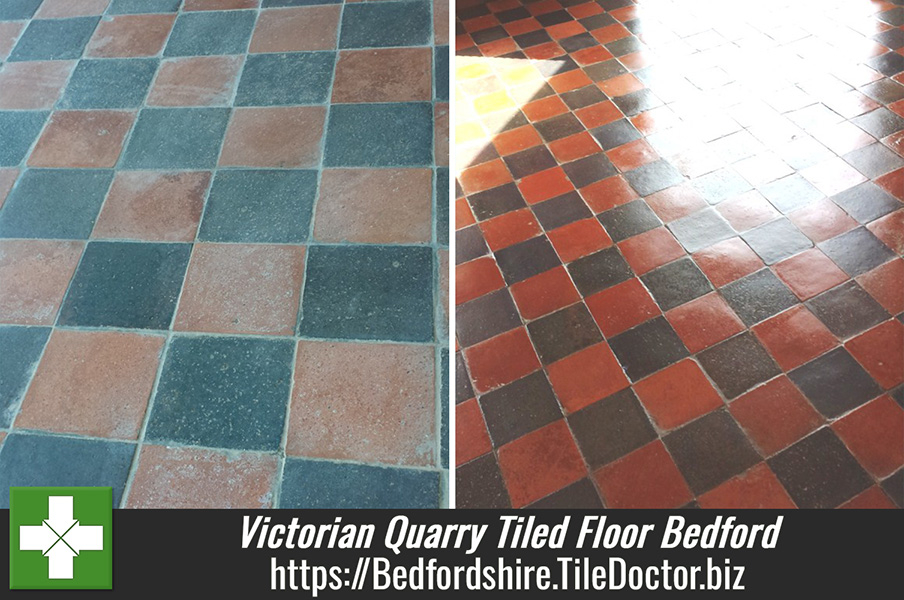
Victorian Quarry Tiles Bedford after cleaning and sealing

Victorian Quarry Tiled Floor Refreshed in Bedford

This was a very straightforward request to clean and seal an old Quarry tiled floor that dated back to the Victorian era. The tiles didn’t appear to have any sealer or other treatment applied, it could be if there was anything it had worn off a long time before.

Cleaning Old Quarry Tiles

A strong dilution of Tile Doctor Pro-Clean was applied to the floor and left to soak into the tile for around twenty minutes before being worked into the floor using a rotary floor scrubber fitted with a black pad. Pro-Clean is a strong alkaline product so unlike acid based cleaners it’s safe to use on any tile and stone which given the age of these tiles was quite an important consideration.

Pro-Clean was also used along the grout lines which were scrubbed by hand using a stiff brush. The floor was then rinsed with clean water which was removed using a wet vacuum and the whole process repeated until we were happy that the tile and grout was clean.

This process took most of the day and before we left the floor was given a thorough rinse with clean water to remove any trace of Pro-Clean as this can upset sealing later on.

Victorian Quarry Tiles Bedford before cleaning Victorian Quarry Tiles Bedford after cleaning and sealing

Sealing Quarry Tiles

The floor was left to dry overnight and when we came back the next day we were able to start the sealing process. For sealing a combination of sealers was used starting with a single coat of Tile Doctor Colour Grow; Colour Grow is a impregnating sealer that fills the pores in the tile in order to repel any contaminates that can stain the floor, it also as its name suggests brings out the colour in the tile. Once this had dried a coat of Tile Doctor Seal and Go was applied which is a topical sealer that adds a nice sheen to the floor. This proved to be a great combination and the quarry tiles looked really nice when they were finished in fact the customer was so surprised by the result we had managed to achieve.

Cleaning old Victorian Quarry Tiles in Bedford

Victorian Quarry Tiled Floor Refreshed in Bedford Read More »

Cleaning Ceramic Kitchen Floor Tiles in Bedford

Cleaning Ceramic Kitchen Floor Tiles in Bedford

The photograph below was taken in the kitchen of a residence in Bedford where the new owner wanted the Ceramic floor tiles deep cleaned before they moved in; you can see for yourself how dirty they had become.

Cleaning Ceramic Kitchen Floor Tiles in Bedford

Cleaning Ceramic Floor Tiles

To get the clean Ceramic tiles clean I applied a medium strength dilution of Tile Doctor Pro-Clean mixed 50/50 with NanoTech Ultra Clean with a mop; this was left to dwell on the surface of the tile for around twenty minutes. The next step was to then run over the floor using our high pressure Rotovac machine which applies and removes water at high pressure to remove the soil and rinse the floor at the same time. The Rotovac machines are an expensive investment but they do make Tile Cleaning easier, they are also flexible and can be used for carpet cleaning etc.

Deep Ceramic Tile Cleaning in Bedford

Cleaning Ceramic Kitchen Floor Tiles in Bedford Read More »

Limestone Bedford Olney After Cleaning

Deep Cleaning and Sealing Limestone Tiled floor in Bedford

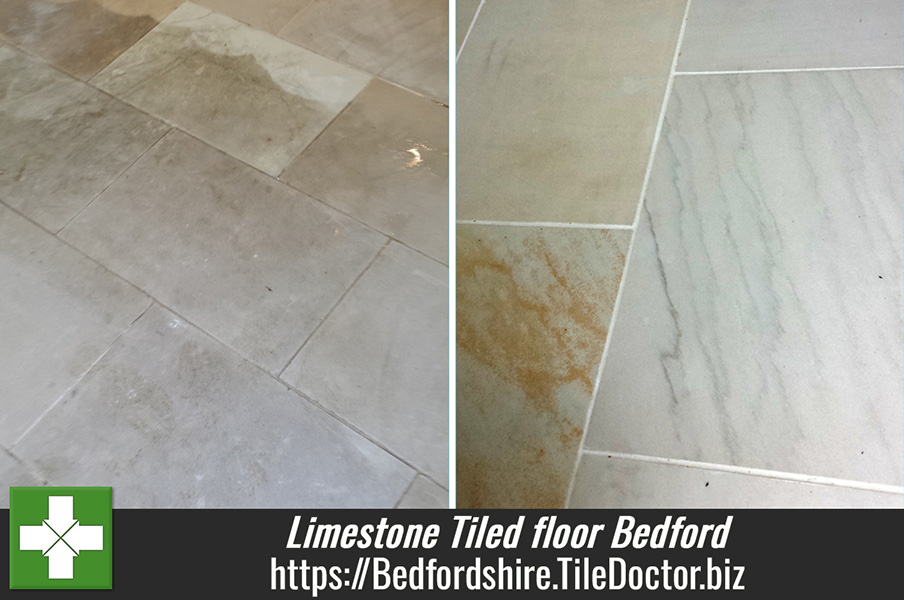
This was a Limestone tiled floor that had seen better days, unfortunately the customer had not been given the right advice and had been cleaning the floor with a popular supermarket floor cleaning product which being slightly acidic had over time stripped all of the sealer off the tile. With no sealer present dirt and grime had become ingrained into the pores of the tile making it impossible to clean.

Limestone Bedford Olney before cleaning

Deep Cleaning Limestone Floor Tiles

To deep clean the floor I decided to use a medium dilution of Tile Doctor Pro-Clean which was left to soak into the tile for around thirty minutes before working it in with a rotary machine fitted with a black scrubbing pad.

We let the solution dwell a bit longer whilst we setup the Rotavac machine which is a brilliant piece of kit that directs fresh warm water under pressure onto the tile whilst simultaneously removing the soiled solution with a secondary vacuum back to a storage unit on the van. The combination worked well and the floor was soon looking a lot cleaner, there were some areas that needed further attention including the grout which we hand scrubbed along the grout lines.

Once happy that the tile and grout was clean the floor was then left to dry.

Sealing Limestone Floor Tiles

Once the floor was dry it was sealed using two coats of Tile Doctor Colour Grow which is a colour enhancing sealer which provides maximum stain protection on natural stone floors whilst bringing out the deep colour in the stone. The last step was to buff the floor to a nice shine with a rotary machine fitted with a white buffing pad.

Limestone Bedford Olney After Cleaning
The final result was amazing and the customer was very happy also to make sure we didn’t get called back too soon I gave them advice on how to clean the floor in the future using Tile Doctor Neutral Clean which is a PH neutral cleaner that is safe to use on Tile, Grout and Stone.

Limestone Floor Deep Cleaned and Sealed in Bedford

Deep Cleaning and Sealing Limestone Tiled floor in Bedford Read More »

Ceramic Tiles Bedford Coffee Shop Before and after

Cleaning Ceramic Tiles in a Bedford Coffee Shop

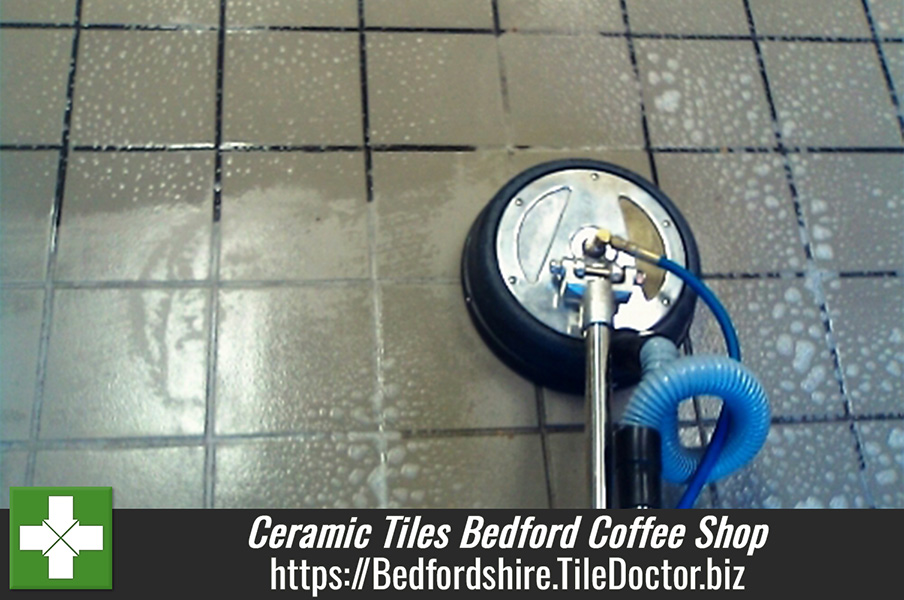
The Ceramic tiles with dark grout were installed in a Bedford Coffee Shop where we have a regular contract to deep clean the tile and grout, whilst we appreciate the regular work you do have to work out of hours to minimise impact to trade. It’s worth noting that many commercial tiling installations do avoid white grout as it can get dirty quite quickly and will be difficult to clean if badly stained, not that that’s a problem for Tile Doctor as we have a solution for most problems.

Cleaning Ceramic Floor Tiles

This was a general maintenance clean so a dilution of Tile Doctor Pro-Clean was applied to the floor and left to soak in for 20 minutes or so before giving the floor a thorough clean using a Rotovac machine which applies and removes water at high pressure to remove the dirt and rinse the floor. Once this was done we took the opportunity to apply more Pro-Clean to the grout and hand scrubbed along the grout lines using a stiff brush to ensure the black grout was clean.

Ceramic Tiles Bedford Coffee Shop Before and after
Ceramic tiles don’t normally need a sealer so once all the tile and grout was clean and was dry we were done.

Ceramic Coffee Shop Floor Tiles Cleaned in Bedford

Cleaning Ceramic Tiles in a Bedford Coffee Shop Read More »

=================================

Bedfordshire Tile Doctor

================================= Read More »

Scroll to Top